Ingredients:
3 Cups Chopped Carrots,
1 Medium Onion or 1 Leek Chopped,
1 Medium Potato, Skinned and Chopped
1 Tablespoon Olive Oil,
2 Tablespoon Coriander Seeds,
1/3 Cup Cilantro, Chopped
Salt to Taste,
1/2 Teaspoon Pepper
3.5-4 Cups Water
Method:
Grind the coriander seeds to powder. Heat oil in a pan. Add onions/leeks and saute for 2-3 minutes. Now add the potatoes and cook for another minute. Add the carrots, salt and ground coriander seeds. Cook for 2-3 minutes. Then add 3.5 cups of water. Cover and cook on medium heat for 20 minutes, or until the vegetables are tender. Switch off the flame then add chopped cilantro.
Transfer the mixture to a food processor while still hot. Process carefully until smooth. You might have to blend the mixture in batches depending on the size of the food processor. Add more water per the consistency you desire. I like my soup to be thick, so I didn't add any more water. Add salt and pepper to taste.
If you do add more water, transfer the mixture to the cooking pan again and cook/heat for 1-2 minutes.
Thank you for visiting my blog. I would love to hear from you. I appreciate your time to leave feedback and help me improve this blog.
Monday, December 24, 2012
Acorn Squash Stuffed with Curried Quinoa
I received two Acorn Squashes this week in my CSA bag from Tiny's Organic. I have always struggled when it comes to cooking with winter squash. I don't like the taste, and don't like the hassle of chopping/cutting it, since it has a very hard shell. I think, my problem is solved with this recipe:). This was a big hit in the house. It looks and tastes great. My husband and I like quinoa a lot, and pairing it with squash, made it extra tasty.
Here is the recipe
Ingredients:
Squash:
1 Medium Acorn Squash, Washed and Cut in Half Lengthwise
1/2 Tablespoon Olive Oil,
1 Teaspoon Salt,
1 Teaspoon Pepper,
Stuffing/Quinoa:
1 Teaspoon Olive Oil
1/4 Cup Onion, Chopped,
2 Garlic Cloves, Chopped,
3/4 Cup Quinoa,
2 Teaspoon Salt, or to Taste,
2 Cups Water,
2 Teaspoon Tomato Paste, or 1/4 Cups Chopped Tomatoes,
1/4 Cups Frozen Peas,
1/4 Cups Frozen Corn,
2 Tablespoon Fresh Carrots, Chopped,
Pulp From the Squash
1 Teaspoon Chili Powder,
1/2 Teaspoon Turmeric Powder,
1 Teaspoon Garam Masala or Curry Powder,
1 Teaspoon Cilantro, Chopped,
Garnishing:
1 Tablespoon Pistachios, Chopped,
1 Teaspoon Cilantro, Chopped
Method:
Squash:
Squash: Pre-heat oven to 400 Degrees F. Scoop out the pulp and the seeds from the squash. Separate the seeds from the pulp and save both.
Make a small cut on the back of both halves to make a stable base.
Prick some holes in the squash with the help of a fork. Brush both halves with olive oil. Sprinkle the the salt and freshly ground pepper. Transfer to a baking dish with cut side up. Bake on the middle rack for 15 minutes or until tender but not completely cooked.
Quinoa:
While the squash is cooking, heat the oil in a pan. Add the onion, and garlic and stir and cook for 30-40 seconds. Now add quinoa and carrots. Stir and cook for 30 more seconds. Now add the frozen vegetables and cook again for 30 more seconds. Then add the water, salt, squash pulp, cilantro and spices. Stir well. Bring the mixture to a boil. Switch the flame to low and cook covered for 15 minutes, or until just done (kind of thick/mushy consistency), but not done completely.
Take out the squash halves. Divide the quinoa mixture in two. Transfer to each squash half. Bake again for 10 minutes. This way, the quinoa and squash will finish cooking, and we will get some quinoa flavor in the squash. Take out of the oven. Garnish with cilantro and pistachios. Serve hot.
Tip/Note: You can bake/roast the squash seeds at the same time as the squash (second half), when you put the quinoa stuffed squash in the oven. Just wash and pat dry the seeds. Transfer into a baking dish. Drizzle with some oil, sprinkle some salt and mix well. Bake for 10 minutes (while the squash is baking). Turn off the oven, and leave the seeds in for another 15-20 minutes. Your crispy/crunchy seeds are ready to munch on. My squash seeds were very tender, so I did't even have to shell them before eating. I ate the seeds, shell and all. My 22 months old daughter loves it.
Thank you for visiting my blog. I would love to hear from you. I appreciate your time to leave feedback and help me improve this blog.
Wednesday, November 21, 2012
Oats Chivda
I have to admit, I am one of those people who don't like oatmeal. I have tried it in many different flavors, brown sugar, maple, berry etc etc, but I can't get past the sticky and gooey consistency of oatmeal. Therefore, I started making oatmeal dosas, where I don't have to deal with sticky oatmeal anymore:). Now I have a second favorite recipe for oatmeal....chivda. I can make this in advance, and bring a cup full to work everyday, and have it for breakfast with chai. Salty, crunchy, healthy and satisfying breakfast!!!
Ingredients:
2 Cups Oatmeal
2 Teaspoon Oil
A pinch Asafoetida,
2 Teaspoons Unsalted Peanuts,
4 Green Chilies, Cut into Big Pieces
1 Teaspoon Sesame Seeds,
1/2 Teaspoon Mustard Seeds,
1 Teaspoon Sugar,
1.5 Teaspoon Salt,
1/2 Teaspoon Amchur Powder
Method:
Dry roast the oat meal in a non stick pan on low flame for 7-10 minutes, or until light brown and fragrant. Take off the stove and keep aside. In a pan, heat 1 teaspoon of oil. When hot, add the peanuts. Cook on medium low flame for 3-4 minutes, or until light brown. With a slotted spoon, take out the peanuts and add to the oats.
Now add the remaining oil to the pan and heat again. Once hot, add the asafoetida and mustard seeds. When the seeds start to crackle, add the chilies. Cook for 4-5 minutes, or until the chilies look crispy and the color changes to light green. Now add the sesame seeds. Cover the pan with a splatter, so that the sesame seeds don't fly out of the pan. Cook for 1-2 minutes. Don't let the sesame seeds to brown/burn.
Now add the sugar, salt, and amchur powder to the pan. Mix well. Add the oats and peanuts to the pan. Stir again to coat the oats with spice. Cook on medium low flame for about 1 minute. Take off the stove and transfer to a big flat dish to cool. Let it cool completely before storing.
Note/Tip: You can add roasted chana dal (daariya) too. I didn't have it on hand, so I didn't add it. Add them to the oil after taking out the peanuts. Once cooked, take them out of the oil too. You can also add kismis (Golden raisins). Do this at the same time of adding the spices.
Thank you for visiting my blog. I would love to hear from you. I appreciate your time to leave feedback and help me improve this blog.
Thursday, November 15, 2012
Khasta Kachori, Dahi Kachori or Raj Kachori

This one of my absolute favorite dishes. I grew up in Mumbai, and never thought of making it at home while I was there. Now, after moving to Seattle, I find that, most of the places here don't sell Khasta Kachoris. The ones that do, don't know what Khasta kachori is supposed to taste like. They just make puffed puri with any kind of stuffing they like, and sell it as "Bombay Khasta Kachori". I tried it once, and told my self, NEVER again will buy khasta kachoris from here. It is better to make them at home. It is fried, and it is time consuming to make these, so I don't make it often. Instead, I make it on occasions, just like I made them for Diwali this year.
The following recipe will make about 6-7 big kachoris.
Ingredients:
Dough:
1.5 cups Maida (All purpose flour),
1/2 Cups Water
1. teaspoon Salt,
1 Tablespoon Oil,
Stuffing:
2 Tablespoon Oil,
1/2 Teaspoon Asafoetida
1/4 Cups Yellow Mung Daal, Soaked in Water for 4 hours Minimum,
1 Tablespoon Gram Flour,
1 Teaspoon Chili Ginger Paste,
1 Teaspoon Chili Powder,
1/2 Teaspoon Garam Masala Powder,
1 Teaspoon Amchur Powder,
Serving:
1/2 Cup Cooked Mung Sprouts,
1/2 Cup Potatoes, Boiled and Cut into small pieces (optional)
1/2 Cup Khajur Imly Chutney,
1/2 Cup Green Chutney,
1 Cup Yogurt(dahi), Churned with 1/4 Cups of Water,
Chaat Masala, as needed,
1 Cup Fine Sev,
Method:
Dough:
Mix the maida, oil and salt in a deep pan. Add a little water at a time to make medium stiff dough. Apply 2 drops of oil to your palms. Knead the dough one last time. Cover and keep aside.
Stuffing:
Heat 1 tablespoon oil in a kadai(pan). Drain the mung daal and save the water. Add the daal to the kadai. Add salt and stir well. Add 3 tablespoons of the saved water to the mung daal and cook covered on medium low flame for 10-15 minutes, or until just tender. Keep an eye on the water. Add a little at a time if need. (We don't want the daal to get mushy, but we don't want any water leftover either) Take off the stove, and transfer the daal to a bowl. In the same pan, add another tablespoon of oil. Once hot, add the asafoetida and then immedietly add the gram flour. Stir and cook for 5-10 seconds. Now add the cooked mung daal, chili ginger paste, red chili powder, garam masala and amchur powder. Cook on medium flame for 4-5 minutes. Take off the stove. Spread it on a dish and let it cool completely. Divide the mixture in 6 equal portions.
Assembly:
Divide the dough into 6 equal portions. Roll out one section into 5 inch diameter disc. Put one portion of the stuffing (about 1-1.5 tablespoon) in the center of the disc. Gently, lift all sides of the disc and bring them up to the center. Press all sides into each other to seal. Roll lightly to press the sealed area. Cover with a plastic wrap, or wet paper towel and keep aside. Repeat the same process for the rest of the kachoris.


Note: The picture above is just after pressing the sealed edges to the center. I forgot to take a picture of the final rolled kachori.
Heat sufficient oil in a kadai. Once hot, change the temperature to low, and let the temperature rise again. Take off very tiny portion of the dough from one kachori (seal area, keep in the seal intact), and drop in the oil. If the dough rises back up on top immedietly, the oil is ready. Drop 2-3 kachoris in the oil. Keep the heat to low. Deep fry them on both sides for 10-15 minutes, or until golden brown, and firm. Take off the stove. Transfer onto an absorbent paper. Repeat the frying process for the rest of the kachoris. Let them cool completely before storing. Make sure that the kachoris have become hard/stiff. If any portion is soft, it is not done. Re-fry until done.
Sprouted Mung: Heat a little oil in a kadai. When hot, add the sprouted mung, salt and turmeric powder. Add a little water. Cover and cook on medium low flame for 10 minutes, or until just tender. Take off the stove.
To Serve:
Break the top portion of the shell of the kachori. Stuff with the mung sprouts, potatoes and chutneys. Sprinkle the chaat masala powder. Pour 1 ladle full of dahi on top of the kachori. Top it off with sev. Sprinkle some more chaat masala and serve.
Thank you for visiting my blog. I would love to hear from you. I appreciate your time to leave feedback and help me improve this blog.
Monday, November 12, 2012
Baked Ghughra

My husband loves ghugra, but he tries not to eat too much fried food, so I have been making these baked ghugra for the past 2 years now. We really like them. Since they are not fried, they don't taste the exact same, but they don't taste bad at all. And, since they are not fried, we can indulge a little bit.
Important Note: Since we are baking the ghugras, please follow the recipe as mentioned below. We need cold butter. The dough should be kept in the fridge until needed. Cold butter in the dough will help to make the crust a little "flaky". As the butter melts in the oven, it will create tiny air bubbles in the dough, which is what we want. If cold butter is not used, and if the dough is not cold while making the ghugras, we will get hard and brittle crust.
Ingredients:
Shell:
1-1/4 Cups All Purpose Flour,
2 Tablespoon Cold Unsalted Butter
1/4 Cups Milk + 1 Tablespoon for glazingStuffing:
1 Tablespoon Teaspoon Ghee,
3/4 Cups Rawa (Suji/Semolina),
1/4 Cups Milk Powder
1/4 Cups Ground Almond (You can use any nuts or mixture of nuts of your choice),
2 Tablespoon Kismis (Yellow Raisins)
1 Tablespoon Khus Khus (Poppy Seeds),
1/4 Cups Dried Shredded Coconut,
1 Cup Ground Sugar (or Powdered),
1/4 Teaspoon Cardamom Powder,
A generous pinch Saffron,
Method:
Cut the cold butter into small pieces. In a deep bowl, combine the flour and butter well. Add half the milk and knead. As more milk as needed, to make stiff dough. Apply some oil to your hands and knead the dough one last time. Cover with a plastic wrap and transfer to the fridge while we work on the stuffing.
In a bowl combine all the ingredients for the stuffing except the ghee and saffron. Crush the saffron between your finger and thumb, and add to the rest of the mixture. Heat the ghee in a pan. When heated, add the stuffing ingredients. Roast on low flame stirring frequently for 10-15 minutes, or until the mixture is aromatic and turns pink/golden brown.
Take out the dough. Divide it into 20 equal portions. Roll each portion into 3 to 4 inch diameter disc.Take 2 tablespoon of the stuffing mixture and place it in the center of the disc. Carefully fold one side of the disc onto the other and pinch the middle portion shut. Work on your way to each side to gently pinch and seal the sides, leaving a little opening on one of the sides. Now add more stuffing mixture if needed from this opening. Make sure that the stuffing doesn't touch the sides of the disc otherwise you won't get a good seal. Now seal the opened end too.
Now comes a little difficult part. To make "pleats", pinch and gently pull the corner of the seal from a side between your thumb and finger. Do not pull very hard, we just want about 1/2 centimeter of the portion pulled out. Now fold it onto itself and press the edge of the folded portion with the tip of your thumb/nail to create an indentation. Now pull the immediate adjacent portion of the dough and fold to create an indentation. Follow the same procedure and work your way to the other corner. Make sure that the whole edge is sealed. If there is any opening, the sugar will ooze out during baking, which will create a mess.
If you don't know how make the pleats, or if you don't succeed at it:), then you can use a fork and gently press it throughout the sealed edged area to make sure that all sides are sealed completely and to get nice pattern around the sealed edge. Follow the same procedure for to make the rest of the ghughras. Transfer into a baking sheet lined with parchment paper of silicone mat. Cover the ghughras with a plastic wrap again, and transfer to the fridge for 10 minutes.
In the meantime, pre-heat the oven to 355 degrees.
Take out the baking sheet from the fridge. Grease the top surface of each ghugra with milk. Bake it for 15 minutes or until the underside turns golden brown. Take out of the oven. Turn over each piece. Glaze the top side with milk. Put it back into the oven and cook for another 15 minutes or until the other side starts turning golden brown. Turn off the oven and leave the ghugras in the oven for 4-5 minutes. Take them out. Let them cool completely before storing them. The outer cover should have become hard by now.Store them in airtight containers.
Thank you for visiting my blog. I would love to hear from you. I appreciate your time to leave feedback and help me improve this blog.
Wednesday, November 7, 2012
Mung Beans Salad (chat)

I like salads made from different pulses. Most of the time, I make salad from kabuli chana, but I do like mung salad, and mixed pulse salad too. I have already posted a recipe for Kabuli chana salad (chaat). I will post a recipe for mixed pulse salad the next time I make it.
Salads made from pulses are full of protein. They require little to no time (except the soaking time), and are low fat, and nutritious.
Ingredients:
1 Cup Uncooked Mung Beans,
5 Cups Water
1 Tablespoon Oil,
Salt to Taste,
1/4 Teaspoon Asafoetida,
1/4 Teaspoon Turmeric Powder,
1 Teaspoon Chili Ginger Paste,
1/4 Cup Onion, Chopped,
1/2 Cup Tomatoes, Chopped,
1/4 Cup Bell Pepper, Chopped (you can try different colors)
1 Tablespoon Cilantro, Chopped,
1 Tablespoon Lemon Juice,
1/2 Teaspoon Chat Masala
Method:
Wash mung beans and soak in 5 cups water for 6 hours minimum.
Save about 1 cup of water, and drain the rest.
Heat oil in a pan. Once hot, add the asafoetida, and drained mung beans. Add salt, chili ginger paste, turmeric powder and about 1/2 cups of water. Cover and cook on medium heat until done, about 20-25 minutes. Keep adding 1/4 cups water if it gets dry and hasn't cooked already. When done, there should be no water left and you should be able to mash the beans by pinching between your fingers, but they shouldn't be mushy.
Take off the heat. Transfer to a mixing bowl. Add the onion, tomatoes, cilantro, lemon juice, and chat masala and mix well. Serve warm.
Note:
1. Adjust the quantity of lemon juice, salt and chat masala per your taste preference.
2. You can add your choice of veggies. Cooked corn would taste great, and would add color to the dish. Sweet peppers would taste great too. You can also add pomegranate.
3. This salad can also be made with sprouted mung beans. To get the sprouts, drain the beans and transfer to a bowl. Cover and keep in dark place for two days. Follow the same steps as above for making the salad.
Thank you for visiting my blog. I would love to hear from you. I appreciate your time to leave feedback and help me improve this blog.
Wednesday, October 31, 2012
Sweet Potato Lettuce Tacos
We had Halloween potluck party at my work. I wanted to bring something fresh/refreshing instead of the same old chips and dips, and cookies etc. I needed to make sure that whatever I pick, can be made the day before and can be assembled in no time. I usually don't have enough time in the evening, so I was looking for a "quick-fix" type of dish.
This dish worked out perfect for my criteria. Everyone loved it. It is not spicy, but it is still wonderful and fresh tasting dish.
 Ingredients:
2 Heads Bibb (butter) Lettuce, Iceberg lettuce will work too.
4-5 Sweet Potatoes,
1.5 Teaspoon Cumin Seeds,
2 Dried Red Chili Pepper, or Per Taste
Salt to Taste,
1 Teaspoon Chat Masala,
2 Tablespoon Cilantro, Chopped,
1/4 Teaspoon Turmeric Powder,
2 Tablespoon Oil,
3 Tablespoon Salted Almonds or Salted Peanuts, Coarsely Chopped,
1/3 Cup Mild Cheddar or Mexican Blend Cheese, Shredded
1/2 Cup Tortilla Chips, Crushed
Lemon Juice, From 1 Lemon.
Method:
Stuffing:
Pressure cook the potatoes for 2 whistles. Let them cool. Peel and mash the potatoes.
In another pan, roast the cumin seeds and red chili pepper on low flame for about 5 minutes. Switch off the stove and let it cool. Grind to a fine Powder.
Wash the lettuce and separate the leaves.
 Add the dry ingredients to the potatoes and mix well. Heat oil in a pan. Add the potato mixture to the pan. Stir to combine and cook on medium high heat for 7-8 minutes. Stir occasionally. Add 3/4th of the lemon juice. Transfer the potato mix to a deep dish. Sprinkle almonds and crushed chips on top of the potato mix. Cover with a layer of cheese.
Assembling:
Just about 10-15 minutes before serving, arrange the lettuce leaves in single layer on a big tray/baking or cookie sheet. Drop about 2 tablespoon of the potato mixture into each leaf. Sprinkle some more lemon juice on top of the leaves. Serve immedietly.
If you have a potluck at your home, or you don't want to go through the trouble of assembling each boat/taco, just keep the lettuce leaves stacked up next to the potato filling. Let the guests help themselves.
PS: I was so focused on making the dish last night (before my daughter realized that I am not sleeping next to her) that I forgot to take a picture.
This morning, again, I was trying to get the stuffing in the leaves before the potluck started, so I forgot to take pictures. I did take some pictures mid way thru, but they are not appealing:). I will still upload them, because that is all I have.
Thank you for visiting my blog. I would love to hear from you. I appreciate your time to leave feedback and help me improve this blog.
This dish worked out perfect for my criteria. Everyone loved it. It is not spicy, but it is still wonderful and fresh tasting dish.
 Ingredients:
2 Heads Bibb (butter) Lettuce, Iceberg lettuce will work too.
4-5 Sweet Potatoes,
1.5 Teaspoon Cumin Seeds,
2 Dried Red Chili Pepper, or Per Taste
Salt to Taste,
1 Teaspoon Chat Masala,
2 Tablespoon Cilantro, Chopped,
1/4 Teaspoon Turmeric Powder,
2 Tablespoon Oil,
3 Tablespoon Salted Almonds or Salted Peanuts, Coarsely Chopped,
1/3 Cup Mild Cheddar or Mexican Blend Cheese, Shredded
1/2 Cup Tortilla Chips, Crushed
Lemon Juice, From 1 Lemon.
Method:
Stuffing:
Pressure cook the potatoes for 2 whistles. Let them cool. Peel and mash the potatoes.
In another pan, roast the cumin seeds and red chili pepper on low flame for about 5 minutes. Switch off the stove and let it cool. Grind to a fine Powder.
Wash the lettuce and separate the leaves.

Assembling:
Just about 10-15 minutes before serving, arrange the lettuce leaves in single layer on a big tray/baking or cookie sheet. Drop about 2 tablespoon of the potato mixture into each leaf. Sprinkle some more lemon juice on top of the leaves. Serve immedietly.
If you have a potluck at your home, or you don't want to go through the trouble of assembling each boat/taco, just keep the lettuce leaves stacked up next to the potato filling. Let the guests help themselves.
PS: I was so focused on making the dish last night (before my daughter realized that I am not sleeping next to her) that I forgot to take a picture.
This morning, again, I was trying to get the stuffing in the leaves before the potluck started, so I forgot to take pictures. I did take some pictures mid way thru, but they are not appealing:). I will still upload them, because that is all I have.
Thank you for visiting my blog. I would love to hear from you. I appreciate your time to leave feedback and help me improve this blog.
Tuesday, October 30, 2012
Paneer Pinwheels or Paneer Rolls

We had invited some friends at our house for dinner last night. There were going to come with their kids, so I wanted to make some fun appetizer for the kids to enjoy.
I saw the green chutney bread rolls recipe on Anuja's blog and decided to tweak it to suit my taste and to use what I had in the house. That is how I came up with the Paneer Pinwheels recipe.
Ingredients:
2 Puff Pastry Sheets (1 Package)
1.5 Cups Paneer, Grated,
Salt to Taste
1 Tablespoon Oil,
1/2 Teaspoon Chili Powder,
1/2 Teaspoon Turmeric Powder,
1 Teaspoon Cumin Powder,
1/2 Teaspoon Garam Masala,
1/2 Teaspoon Chat Masala (or Amchur Powder)
2 Tablespoon Chopped Cilantro
2 Tablespoon Butter, Melted
Method:
Thaw the pastry sheets in room temperature for minimum 30 minutes. Do not try to unroll/unfold the pastry sheets until it has thawed completely (30 mins), otherwise it will break apart.
Pre-heat the oven to 400 degrees F.
Combine paneer with all the dry spices and cilantro in a bowl. Heat oil in a pan. When hot, add the paneer mixture. Cook on medium high heat for about 5 minutes, stirring frequently. Take off the stove. Transfer to a bowl or plate and let it cool.

Carefully unfold the pastry sheets. Divide the paneer mixture in half and spread on both sheets, leaving about 1 inch room on 1(shorter) side of the sheet.


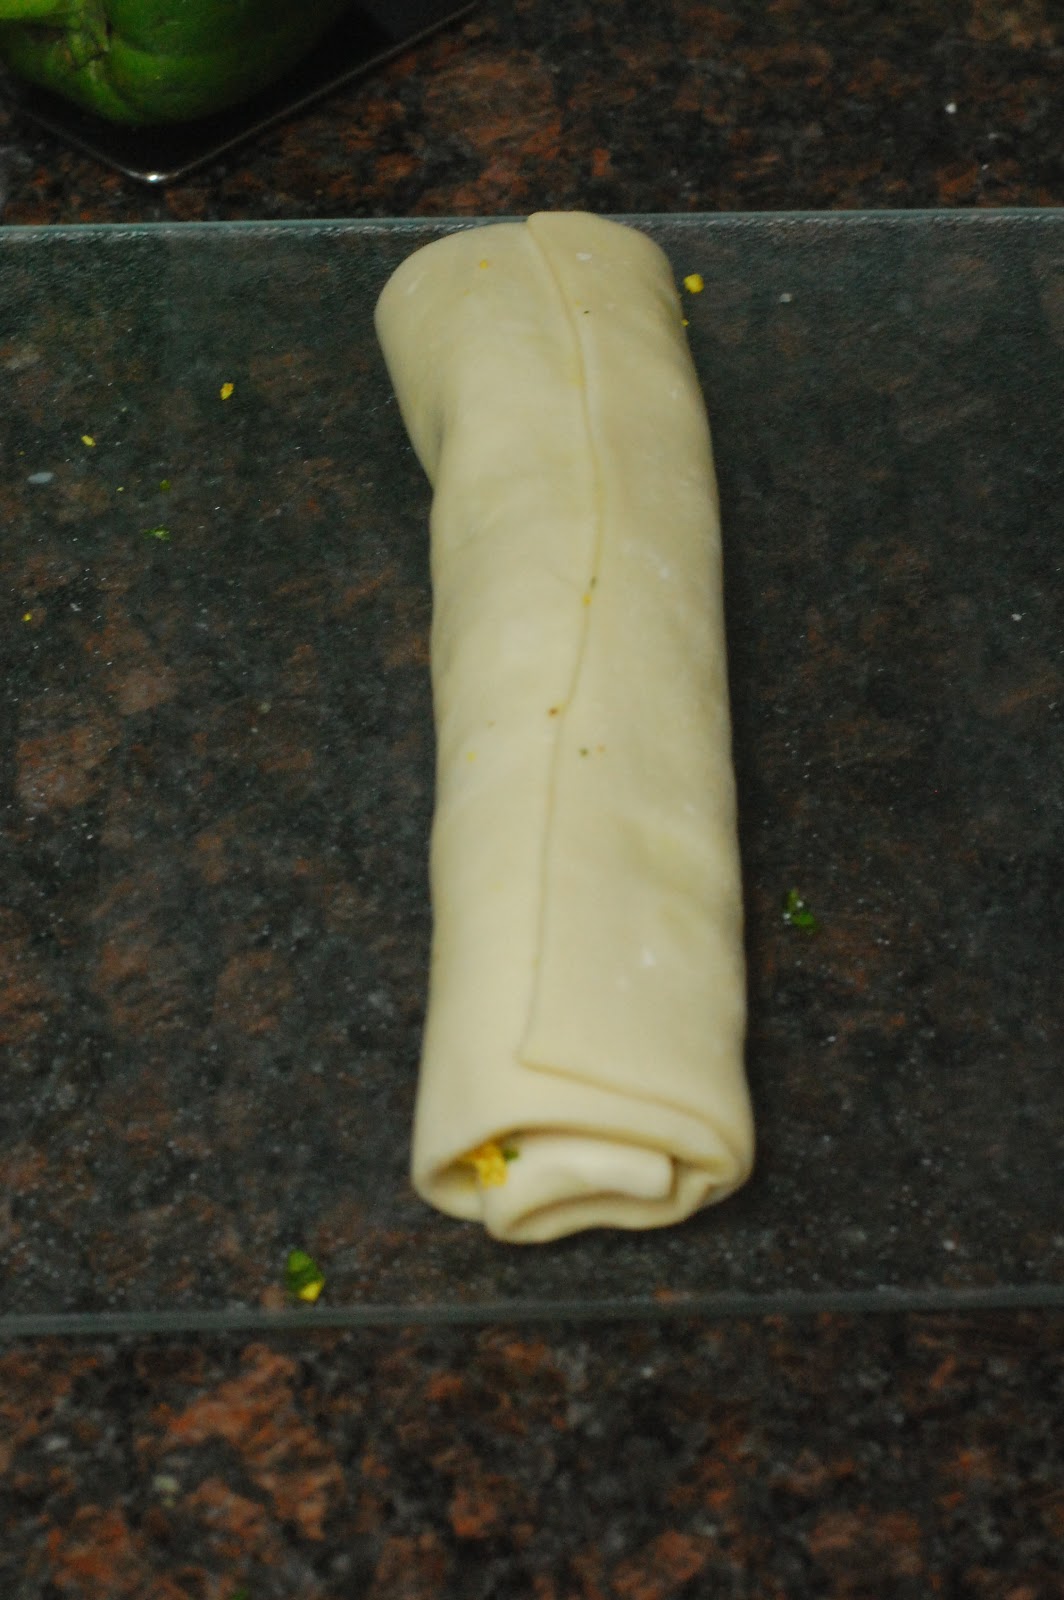

 Place a parchment paper or silicone mat on a cookie sheet. You can also grease the sheet instead. Place the pinwheels on the sheet leaving about 2 cm room on each side of the rolls to allow them to puff up.
Carefully, take out of the oven. Brush the melted butter on each roll immediately. Let it cool to room temperature before serving. Serve with your choice of condiment. I served with ketchup.
It was a big hit among the kids and adults a like. (There were none left for me to taste)).

Thank you for visiting my blog. I would love to hear from you. I appreciate your time to leave feedback and help me improve this blog.
Friday, October 26, 2012
Homemade Tahini (Tahina)
I have to go to a kid's Halloween party this weekend. I have signed up to bring kids friendly appetizers. I wanted to make hummus, but I didn't have any Tahini at home. Instead of running to a store and looking for Tahini (we don't get it in all stores), I thought of making it at home and saving me some time. I was quiet pleased with the end result. You can view my hummus recipe here.
Makes a little less than 1 cup.
Ingredients:
1 Cup Sesame Seeds
1/4 to 1/3 cup vegetable oil
Method:
Dry roast the sesame seeds on very low flame until fragrant (about 7-10 minutes). Stir frequently while roasting and do not let it brown. Let it cool.
Add the sesame seeds and 1/4 cup oil in the food processor. Grind it to a fine thick paste. Add more oil as needed. Grind again to mix things well. Store in the refrigerator in an air tight container.
Thank you for visiting my blog. I would love to hear from you. I appreciate your time to leave feedback and help me improve this blog.
Wednesday, October 17, 2012
Tofu Scramble

Ingredients:
1 Block of firm tofu, Cut into 1 Inch Cubes,
1/4 Cups Onion, Finley Chopped
1 Bell Pepper, Chopped Finley
1/4 Cup Frozen Peas,
1 Teaspoon Oil,
3 Tablespoon Water
Salt to Taste,
1/2 Teaspoon Turmeric Powder
1/2 Teaspoon Freshly Crushed Black Pepper,
Method:
Heat oil in a pan. Once hot, add the onion and bell pepper. Cook for 5-7 minutes or until the veggies are a little tender. Add the tofu pieces, salt, pepper, and turmeric powder. With the help of a potato masher, mash the tofu pieces in the pan. Add the water. Mix well and mash again until it breaks into crumbles. Cook on medium high flame for 5 minutes. Take off the stove and serve.
Note: You can also use this as a filling for a burrito. Just add place some sauted veggies in the burrito, place some of the tofu. Add your choice of sauce (salsa, ketchup etc), some grated cheese and enjoy.
Thank you for visiting my blog. I would love to hear from you. I appreciate your time to leave feedback and help me improve this blog.
Panera Bread Style Low Fat Garden Vegetable Soup
 As I mentioned in my previous post. I had the Low Fat Garden vegetable Soup with Basil Pesto from Panera bread for dinner two days back. I love their soup. It consists of a lot of vegetables. It also has some pasta which fill you up. The soup is a low fat soup, which is always good and it tastes good too. I tried to replicate it at home last night. I would say it tasted pretty close, if not the same.
The Panera Bread soup consists of pearl barley. I didn't have pearl barley at home, so I added quinoa, to get similar texture. I also added farfalle (bow-tie pasta), instead of the elbow pasta, which is what the soup has.
The following recipe makes a big batch (atleast 6 bowls full) of soup. Cut the recipe in half if you would like to make a smaller batch.
Ingredients:
3 Large and juicy tomatoes (2 Cups) cut into medium size pieces)
1 Big Zucchini, Cut into Small Pieces
1/2 Cup Yellow Onion, Finley Chopped (any mild tasting variety will do),
1 Cup Bell Pepper, Finley Chopped,
1/4 Cup Frozen Corn,
3 Cloves Garlic, Finley Chopped,
6 Oz Tomato Paste (1 Small Can)
1/4 Cups Quinoa
3 Cups Water (for Soup)
1/2 Cup, Uncooked Farfalle or Bow-tie pasta (You can use any shape of small sized pasta)
3 Tablespoon Olive oil
2 Tablespoon Parmesan Cheese,
1/2 Teaspoon Dried Basil, OR 4-5 Fresh Basil Leaves, Chopped
1 Teaspoon Italian Seasoning, (herbs blend),
1 Teaspoon Salt, or to Taste,
2 Teaspoon Freshly Crushed Black Pepper, or to Taste,
3 Tablespoon Homemade Basil Pesto
1 Teaspoon Crushed Red Pepper (Optional)
Method:
Heat the oil in a big pan. Once hot, add the onion, bell pepper, corn, quinoa and zucchini. Cook on medium high heat for 5 minutes. Then add the cut tomatoes and garlic. Cook again for another 5 minutes. Now add water, tomato paste, salt, and pepper to the soup and bring it to a boil. Once it starts boiling, reduce the heat to simmer. Cover and cook for 30 minutes.
In the mean time, on another stove, boil enough water to cook the pasta in. Add salt and let the water come to boil. Add the pasta and cook for recommend time (on the package). Drain and keep aside.
After 30 minutes of simmering, add the basil pesto, pasta, Italian seasoning, pamersan cheese and dried basil (or chopped fresh basil)to the soup. Cook on for another 5 minutes, just to get everything mixed up well. Turn off the stove. Add crushed red pepper if desired. Serve hot with warm baguette.

Notes:
-- I like my soup very thick and chunky. You can add more water if desired.
-- You can also add other vegetables of your choice. Some Examples: carrots, peas, green beans etc etc. Some kidney beans would taste good too. I wanted to add carrots, but forgot about it when I was chopping the rest of the veggies.
 Thank you for visiting my blog. I would love to hear from you. I appreciate your time to leave feedback and help me improve this blog.
French Baguette
 |
| Right out of the oven |
Since that day, I have been thinking of making the same bread at home. I tried to look for recipes for panera bread style baguette, but couldn't find anything. So I read different articles on how baguettes are made, and tried to make it on my own. The bread turned out very good, with thin and crunchy crust. It tasted great right out of the oven. But the crust softened after a few hours. I will have to experiment with different oven temperature/time ratio to get the crust to stay crunchy for hours.
Here is my recipe for making french baguette.
Ingredients:
3-1/2 Cups All Purpose Flour
1-1/2 Teaspoon Yeast
1 Teaspoon Sugar
1 Teaspoon Salt
1-1/2 Cups Warm Water (Not hot),
1/2 Teaspoon Oil
Cooking Spray
Method
Mix the yeast and sugar with the water. Stir well to dissolve the yeast and the sugar. Keep it aside for 10 minutes. Mix the flour and salt. Now add the yeast water mixture. Apply the oil to your palms and knead the dough. The dough will be a little sticky. Don't add flour yet. Knead the dough for about 5 minutes. (If the dough is still sticky, add a teaspoon of flour and knead again). Knead util the dough becomes smooth and elastic.
Very lightly spray a glass bowl with cooking spray. Transfer the dough to the bowl. Cover with a lid or a plastic wrap and keep it in warm place for 1 hour. The dough will have doubled in volume.
Sprinkle some flour on a kneading surface and take out the dough from the bowl. Divide it into two equal sizes. Cover one portion with the plastic wrap. Take the portion and knead it for a minute or so. Then with the heel of your hands, press lightly on the dough to flatten it. With your fingers, spread the dough to about 6 X 4 inch rectangle Now lift one of the longer sides and fold it to the center and lightly tap with your fingers to seal it. Lift the other side, and fold it to the center and lightly tap with your fingers to seal it. Now, you have two sealed edges in the center. Fold the longer side again, this time to the end of the other longer side, creating one seal at the end. Lightly tap again to seal it.
Keep the sealed side down, and lightly roll the dough 1/2 way thru with both of your hands to give it a log(tube) like shape. While rolling, move your hands to the outside edges while applying pressure. This creates uniform thickness on the log. Do this until your roll is about 10-12 inches long. Your seal should get better each time your roll the dough. Just keep in mind to keep the sealed surface down.
Lightly sprinkle the base of a baking tray with little flour. Place the log in the baking tray. Cover with a plastic wrap and leave in a warm place for 30 minutes. Follow the same process and make a log from the other portion of the dough.
Fill an oven safe deep dish/pan with 2 inches of water. Place the pan under the rack on which the bread will be baked. Pre-heat the oven to 450 degrees F.
Remove the plastic wrap from the baking sheet. Just before placing the bread in the oven, make slanted cuts on the top surface at about 4 inches distance. The cuts shouldn't be more than 1/4 inch (5 mm) deep.
Place the baking sheet in the oven. Bake for 5 minutes. Then carefully take out the water filled pan from the oven. The water will be boiling hot. Be very careful while handling the pan otherwise the water will splash everywhere. Wear thick rubber gloves, gently take the pan out. Discard the water and keep the pan away. Close the oven door and bake the bread for another 12-15 minutes.
Turn off the oven. Take out the bread. Enjoy hot, right out of the oven, with some hot soup. You can also have it as is with butter. OR Let it cool down completely and make sandwich. It tastes great either way.


Thank you for visiting my blog. I would love to hear from you. I appreciate your time to leave feedback and help me improve this blog.
Monday, October 1, 2012
Masala Paneer for Kids

We had invited our friends for lunch over the weekend. They have 2 kids, both under 5 years of age. Though most of the dishes I had prepared were mild enough for the kids to eat, I still thought of making masala paneer for them. This way, even if they don't feel like seating at one place and eating the whole meal, they can run around the house, and grab a bite of the paneer.
This dish is very easy to make, and usually a hit with kids who like paneer. You can change the spices used in the recipe to your kids liking.
Ingredients:
1/2 lb Paneer, Cut into 1 Inch Thick and 2 Inch Long Pieces,
1/4 Cup Oil,
Salt to Taste,
1/2 Teaspoon Paprika,
1/4 Teaspoon Turmeric Powder,
1/4 Teaspoon Amchur Powder (Dried Mango Powder),
Method:
Heat oil in a pan. Once hot, add the paneer cubes and shallow fry it until all sides are golden brown, stirring occasionally.
Take off the heat, and transfer to a straining basket. This will get rid of all the additional oil. Immediacies sprinkle the salt, turmeric, paprika and amchur powder. Mix well. Transfer to a serving plate, and serve with your choice of chutney or with ketchup.
Thank you for visiting my blog. I would love to hear from you. I appreciate your time to leave feedback and help me improve this blog.
Thursday, September 20, 2012
Paan Flavored Ice Cream
My husband and daughter are very fond of ice cream. Its summer here, and every weekend we see the ice cream van going by in our neighborhood. The moment my daughter (just 18 months old) hears the music played by the ice cream van, she runs to the door, points outside, nods her had and says "Srishti..Ice Cream...Yes" "Srishti...Ice Cream...Yes". I can't stop the ice cream van from coming in my neighborhood, but I can make some ice cream at home, so that when she wants it, she can have homemade ice cream without added food color, artificial sweeteners or preservatives.
I usually make fruit flavored ice creams for her. One of her and my husband's favorites is my Blueberry ice cream.
This time I was looking for some other ideas for making ice cream, and found these beetle leaves in the desi store:), so I thought of making ice cream using them.
Ingredients:
For the Ice Cream
4 Cups Low Fat Milk
1 1/4 cups sugar
1/4 cup cornflour
For the paan flavoring
4 Beetel Leaves(paan)
1 Tablespoo Lemon Juice
6 Dried Dates (Kharek), Soaked Overnight
1 TablespoonFennel Seeds (Saunf),
1/4 Teaspoon Cardamom (Elaichi)
1/4 Cup Gulkand (Sweetened Rose Petals)[You can use Rose syrup if you can't find Gulkand)
4-5 Mint Leaves
Method
Wash the paan leaves. Add them to the blender along with the rest of the pan flavoring ingredients and grind them into a very fine paste.
Dissolve the cornflour in ¼ cup of cold milk. Keep aside. Place the rest of the milk in a heavy bottomed pan and bring it to a boil. Add the sugar and simmer for 5 minutes. Add the dissolved cornflour and simmer for another 5 minutes while stirring continuously, till it is of a coating consistency. Remove from the fire and allow it to cool completely. Add the paan flavouring mixture.
Mix well and pour into a shallow dish. Freeze till slushy. Remove and beat with a whisk until smooth and creamy (or use a blender).Freeze again until firm. Scoop and serve.
Needless to say my husband and daughter loved it. My parents, brother and sister visited me about a week later, and it was a big hit among them too.
I think my husband took some pictures before he finished up the ice cream. I will get the pictures from him and post them soon.
Needless to say my husband and daughter loved it. My parents, brother and sister visited me about a week later, and it was a big hit among them too.
I think my husband took some pictures before he finished up the ice cream. I will get the pictures from him and post them soon.
Thank you for visiting my blog. I would love to hear from you. I appreciate your time to leave feedback and help me improve this blog.
Patra
Patra is a Gujarati Dish. it is made spreding a thinck paste of chick peas and some spices on arbi
leaves (colocasia leaves). The leaves are then rolled into a thick log shape and steamed. This
steamed logs are cut into thick discs which looks like pin wheel because of the layers of leaves
and chickpea paste. These discs are then sauted in oil and tempering. It is a bit lengthy process,
but it doesn't require any particular skill. As far as you can find some time, you can make patra
at home.
I found some arbi leaves at a local store here. This was the first time I have ever seen arbi
leaves in a desi(Indian) store, so I grabeed 3 packets of them:), because I didn't want to miss out on
having a lot of homemade patra. Fortulanely my mom was visiting me at the same time, so she made a
big batch of patra for me.
I have scaled down the recipe here in my post so that you can make enough patra for 4.
Ingredients:
Rolls and Stuffing:
8 Big Patra Leaves (Arbi leaves),
2 Cups Chickpea flour
Salt to taste
2 Teaspoon Red Chili Powder,
1/2 Teaspoon Turmeric Powder,
Juice from 1 lemon
2 Teaspoon Grated Jaggery,
2 Teaspoon Oil,
Water as needed.
Tempering
5 Tablespoon Oil,
2 Teaspoon Mustard Seeds,
1 Teaspoon Cumin Seeds,
1/2 Teaspoon Asafoetida
2 Teaspoon Sesame Seeds,
1/4 Cup Grated Coconut (Frozen works fine),
1/4 Cup Finley Chopped Cilantro
Method:
Wash and pat the patra leaves thoroughly.
Put a leaf face side down on a flat surface.With a sharp knife remove the veins from the back of the leaves. Be careful to not break the leaves. You would want to move the knife in hoziontal direction (parallel to the flat surface of the leaf) in order to remove the stems. Please note that you won't be able to remove the entire vein. All you are trying to do is remove the thick/bulgding part from the leaves. Repeat this process for all leaves and set them aside.
Now for the chickpea paste, combine the rest of the ingredients from the rolls/stuffing list. Add a little water at a time to make thick and smooth paste. The paste should not be too runny.
Put a patra leaf face side up on a flat surface. Take 3-4 spoon full of paste and drop it in the center of the leaf. Gently spread it on the entire leaf.

Now put another leaf on top of the paste, and apply the paste again. Repeat this until you have used up four leaves.


Boil enough water in the base vessel of a steamer. Apply some oil on the main vessel and place the logs. Cover and steam for 20-25 minutes or until a knife comes out clean.
(Note: some rice cookers come with a steaming attachment. You can use rice cooker for steaming patra rolls too, but the timing may vary)
Take out of the steamer and allow the rolls to cool completley.
 |
| Steamed Patra Roll |
Boil enough water in the base vessel of a steamer. Apply some oil on the main vessel and place the logs. Cover and steam for 20-25 minutes or until a knife comes out clean.
(Note: some rice cookers come with a steaming attachment. You can use rice cooker for steaming patra rolls too, but the timing may vary)
Take out of the steamer and allow the rolls to cool completley.
Now with the help of a sharp knife cut the roll into 1/2 inch thick discs.Make sure that the discs are cooled completley before following the below step.
 |
| Patra, Cut into thick disks |
Take off the heat. Add 3/4 of the coconut and cilantro. Stir gently to mix well. Sprinkle the rest of the coconut and cilantro on top and serve.
Sorry, I do not have a final picture of the patra, so I am posting this picture from Chachi's kitchen.

Thank you for visiting my blog. I would love to hear from you. I appreciate your time to leave feedback and help me improve this blog.
Monday, September 17, 2012
Basil and Nectarine Lemonade
.JPG)
My this week's bag included basil and nectarines among other fruits and vegetables. Since the weather here is still decently warm, I decided to make lemonade with fresh and crunchy nectarines and sweet Italian basil. The end product was a beautiful and refreshing lemonade, which I wish I made more of:).
The following recipe will make about 3 cups of lemonade.
Ingredients:
1 Nectarine, Chopped into Small Pieces,
1 Nectarine, Thinly Sliced,
1 Cup Large Leaf Italian (Sweet) Basil,
1/2 Cup Sugar,
3 Cups Water
3-4 Basil leaves, Thinly Sliced for garnishing (optional)
1/4 Cup Freshly Squeezed Lemon Juice
Method:
Comine the water, basil, sugar and the chopped nectarine in a boiling pan. Stir until the sugar gets dissolved. Bring the mixture to a boil, then let it simmer for 5 minutes. Take off the stove and let it cool completley.
Strain the mixture through a fine sieve pressing all the juice out from the pulp.
Now add the lemon juice and stir well. Transfer the mixture to the fridge and refrigerate for 30 minutes. Take it out, add the thinly sliced nectarines and basil. Serve cold with ice.
.JPG)
Thank you for visiting my blog. I would love to hear from you. I appreciate your time to leave feedback and help me improve this blog.
Monday, August 27, 2012
Indo Mexican Fried Rice

This is a healthy, colorful and customizable dish which is full of flavor. The main ingredients are listed below. You can add more vegetables of your choice (optional below) to customize it to your taste.
Ingredients:
Rice:
¾ Cups Uncooked Rice
1.5 Cups Water
Salt to Taste
Seasoning:
2 Teaspoon Vegetable oil
1 Small Onion, Julienne (Cut into long thin strips)
2 Big or 3 Small Cloves of Garlic, Finley Chopped,
2 Bell Peppers, Julienne
2 Tomatoes, Cut into Small Pieces
1 Teaspoon Red Chili Powder (Add more if you like it extra hot)
1/2 Teaspoon Turmeric Powder,
1 Teaspoon Chives or Greens from Green Onions, Finley Chopped (Optional)
1/2 Cups Frozen Mixed Vegetables (optional)
Method:
Rice:
Wash the rice with 2-3 changes of water. Transfer it to a pan. Add 1.5 cups water and salt and bring it to a boil. Now, turn the heat to low/simmer and cook covered for 20 minutes. Turn off the stove, and transfer the rice to a big shallow dish so that it cools quickly.
Note: Let the rice cool completley before adding it into the veggies.
Seasoning:
Heat oil in a pan. Once hot, add the onion and garlic, and some salt, and cook on medium flame until the onions are transluscent. Stir occasionally. Now add the tomatoes. Add just enough salt for the tomatoes and cook for 5 minutes or until the tomatoes just start to break down. Add the bell pepper and some salt and cook for another 5 minutes or until the tomatoes completley break down. At this point, add the mixed vegetables, red chili powder and turmeric powder. Cook for 3-4 minutes. Now add the cooked rice and stir fry on high flame for 2 minutes so as to heat up the rice and mix the seasoning well.
Take off the stove and garnish with chives and serve immedietly.
Note: I like to season each layer with salt while cooking, and hence you will notice that I add a little salt each time I add an ingredient in the pan. I feel that this way everything gets evenly seasoned with salt.
You can cook per your preference i.e season each layer (just like I do), add all the salt in the initial layer, or add it at the end.
Thank you for visiting my blog. I would love to hear from you. I appreciate your time to leave feedback and help me improve this blog.
Wednesday, August 8, 2012
Eggless Whole Wheat Chocolate Chip Muffins

When I pick up my daughter from the day care in the evening, the first thing she tells as soon as I put her in her car seat is "mum-mum". We have about 30 minutes drive back home, so I usually give her something to snack on for the ride. As much as I try to give her healthy things to snack on, sometimes she doesn't want anything but something sweet. So, now I have started to make these muffins at home. Knowing that they are made from combination of whole wheat flour and all purpose flour, I get some comfort, when I give these to her for snacking.
Here is the recipe for the eggless muffins.
Note: We don't like to give her foods loaded with sugar, so I have reduced the amount of sugar to fit my need. If you would like to make these a bit sweeter, please add 1 cup of sugar instead of just 3/4 cups.
Dry Ingredients:
1 Cup Whole Wheat Flour
1 Cup All Purpose Flour
3/4 Cup Sugar
1 Teaspoons Baking Powder
1 Teaspoon Baking Soda
1/2 Cup Unsweetend Chocolate Chips
Wet Ingredients:
2 Teaspoons Apple Cide Vinegar
1/4 Cups Vegetable Oil
1-1/4 Cups Milk
Method:
Pre-heat the oven to 350 degrees F.
Combine the dry ingredients in a bowl. Make a well in the center then add the wet ingredients one by one. Mix well.
Grease a muffin tray with cooking spray. Pour the batter in the muffin molds, such that the molds are about half to 3/4th way full. Bake for 20-25 minutes or until a knife when inserted in the center comes out clean. Turn off the oven. Take the tray out of the oven and let it cool completley before demolding.

Thank you for visiting my blog. I would love to hear from you. I appreciate your time to leave feedback and help me improve this blog.
Friday, August 3, 2012
Green Mung Daal Dhokla

My daughter has been sick for the past week, and so she hasn’t been eating anything. She is usually not very fussy about her food, but for the past week or so, she has been very fussy. She doesn’t even want to her favorite food (Parle-G or Marie Biscuits). So, I have been trying to make something new, something I feel she might like, something that can make her feel better, and make her well soon.
Last night, I soaked green Mung daal (Mung daal with skin
on), to make Pesarattu. This morning when I entered the kitchen, I just
remembered that yesterday I had made Adai (Mixed Daal Dosa), and she didn’t
touch it at all. So, instantly, I decided to make dhokla out of the soaked daal.
The recipe below will make batter for 1-10inch diameter thali (1 plate).
Ingredients:
¼ Cup Green Mung Daal (Mung daal with skin, or Chhilkewali Mung
Daal)
1.5 Teaspoon Besan (Gram Flour)
2 Teaspoon Rice Flour
Salt to Taste
½ Teaspoon Chili Ginger Paste
½ Teaspoon Eno Fruit Salt
Oil just enough for greasing the dhokla plate
Method:
Soak the Mung daal in 2 cups water over night. The next
morning, drain the water, but make sure to save about ¼ cups of the soaked
water to make batter.
Transfer the mung daal into a grinder jar. Add about half of
the saved water, and grind into paste. Add more water if needed for grinding,
but do not add to much water. The paste should have thick consistency. Now add
the salt, chili ginger paste, besan flour and rice flour. Stir well to combine
everything together.
Heat a water in a dhokla vessel (steamer or rice cooker with
steaming attachment will work too). Grease a thali with some oil. Once the
water is boiling in the steamer/dhokla vessel, add the Eno to the batter and
stir well. Immediately transfer the batter to the greased plate. Put the plate
in the steamer, and steam on medium high heat for 15-20 minutes, or until a
knife comes out clean.
Take the plate out of the container, and let it cool. Once
cool, cut into small square pieces, and serve with your choice of chutney or
with ketchup.

Thank you for visiting my blog. I would love to hear from you. I appreciate your time to leave feedback and help me improve this blog.
Friday, July 27, 2012
I Won an Online Recipe Event
Nithu Bala from http://www.nithubala.com/ started an event called Healthy Food for Healthy Kids-Rainbow Foods for Toddlers. http://www.nithubala.com/2012/01/event-announcement-healthy-food-for.html.
Sara, from Sara's corner ttp://www.sarascorner.net/ had co-hosted the event http://www.sarascorner.net/2012/06/healthy-food-for-healthy-kids-rainbow.html.
I submitted 4 (four) healthy recipes for toddlers, which included Eggless Banana Muffins, Gobi Paratha, Khajur Rolls and Mixed Vegetable Cutlets, and I won the event/contest.

Hope you like all of these recipes.
Thank you for visiting my blog. I would love to hear from you. I appreciate your time to leave feedback and help me improve this blog.
Sara, from Sara's corner ttp://www.sarascorner.net/ had co-hosted the event http://www.sarascorner.net/2012/06/healthy-food-for-healthy-kids-rainbow.html.
I submitted 4 (four) healthy recipes for toddlers, which included Eggless Banana Muffins, Gobi Paratha, Khajur Rolls and Mixed Vegetable Cutlets, and I won the event/contest.
Here is my Winner Badge

Hope you like all of these recipes.
Thank you for visiting my blog. I would love to hear from you. I appreciate your time to leave feedback and help me improve this blog.
Thursday, July 5, 2012
Eggless Banana and Squash Muffin
This was an experiment to use up left over things in the house:). It turned out to be pretty good though.
I had half spaghetti squash (baked) left after making spaghetti squash "pasta" for my daughter and husband. I also had 2-3 overripe bananas in the house. I had thought of making banana nut bread with the bananas, but at the last moment, I thought of adding the squash too. I also had dried basil in the house, which I had never used. So I created the recipe below to use up all the unused/leftover food in the house. Surprisingly, the muffins turned out soft, moist and full of flavor. Oh!, and they were a big hit at my work.
Ingredients:
1-1/2 Cups "spaghetti" from baked spaghetti squash, or any other uncooked squash grated
2 Overripe Bananas, Mashed
1-1/2 Cups Self Raising Flour
1/8 Cups Milk
1 Cup and 2 Tablespoon Sugar
1/4 Cup Oil
1/2 Teaspoon Salt
1 Teaspoon dried basil (optional)
1/2 Cup Chopped Unsalted Nuts, Any Kind (optional)
2 Tablespoon Oats (Optional), for Garnishing
Method:
Heat the oven to 350 degrees F.
In a bowl, combine the banana and squash. Stir gently to mix well. Then add the rest of the ingredients and mix well.
Prepare the muffin molds or loaf pan by spraying with cooking oil. Pour the mixture into the muffin molds and sprinkle the oats on top OR, if you are making a bread loaf, then pour the mixture into the loaf pan and sprinkle the oats on top. For muffins, bake for 30 minutes or until a knife comes out clean when inserted in the center of a muffin. For bread loaf, cook for 50-60 minutes, or by checking with a knife as mentioned above.
Take out of the oven, and let it cook completely before de-molding it.
This entry is a part of Sara's Corner's Healthy Food for Healthy Kids Contest and Nithu's Healthy Food for Healthy Kids Contest
Thank you for visiting my blog. I would love to hear from you. I appreciate your time to leave feedback and help me improve this blog.
Gobi Paratha for Kids

Gobi paratha is made by making a stuffing out of grated cauliflower and spices, and stuffing it between the dough and shallow frying with ghee. My variation here is, I cooked the cauliflower, so that when kids eat the paratha, they don't taste the raw cauliflower, and the paratha doesn't come apart because of the dry stuffing. Grate the cauliflower with a grater, or chop it very fine. Do not use food processor to grate the cauliflower. This process draws out a lot of liquid, which will cause the stuffing to be very mushy.
Here is the recipe for Gobi Paratha (with a twist:)).
Ingredients:
Dough:
1.5 Cups Whole Wheat Flour,
Salt to Taste
2 Teaspoon Oil
Water as required
1/4 Cup Flower, for Rolling
Ghee OR Unsalted Butter for Shallow Frying
Stuffing:
2 Teaspoon Oil,
1 Teaspoon Cumin Seeds,
1/4 Teaspoon Asafoetida,
1 Cup Cauliflower, Grated
1/2 Cup Spinach, Washed and Chopped into Small Pieces
3 Teaspoon Cilantro, Chopped
Salt to Taste
1/8th Teaspoon Chili Ginger Paste (or Per Your Kid's Taste Preference),
1/2 Teaspoon Cumin Powder,
1/2 Teaspoon Amchur Powder (Dried Mango Powder),
1/4 Teaspoon Turmeric Powder
Method:
Dough: Mix the flour and salt well. Add oil and combine again. Add a little water at a time, to form dough. The dough shouldn't be very stiff, or it will be hard to roll the stuffed bread. Apply some oil to the palms of your hand and knead the dough one last time. Cover with a container and set aside for 10 minutes minimum
Stuffing:
Heat oil in a pan. Once hot, add asafoetida and cumin seeds. Cook for 2 minutes, then add the rest of the ingredients. Cook uncovered on medium-low flame for 5 to 7 minutes, just enough to soften the cauliflower a little bit. Turn off the stove. Take the stuffing out into another container and let it cool completley.

Making paratha:
Divide the dough into 4 equal potions. Take a portion and roll in between your palms to make a ball. Press lightly to flatten it. Dredge with flour and roll a 3-4 inch thik disc.


Lightly press with hands. Gently dredge with the flour again. Roll again very gently by applying very light pressure. You don't want the dough to break and filling to spill out.

Heat a griddle. When it is hot, Place the paratha on the griddle, pinched side up. Cook on medium low flame for 1 minute, or until the underside turns pink/light brown. Gently flip to bring the pinched side down. Change the stove setting to medium high. Apply 1/2 teaspoon ghee on the top (cooked) surface of the paratha, and gently press with a flat spatula to cook all sides. Now flip the paratha again to bring the pinched side up. Apply ghee and cook for 30 more seconds. Flip again, cook for 15-30 seconds and take off the stove. Do the same for the rest of the dough and stuffing.
Cut into equal pieces with a pizza cutter. Serve with ketchup or your favorite dip.

This entry is a part of Sara's Corner's Healthy Food for Healthy Kids Contest and Nithu's Healthy Food for Healthy Kids Contest
Thank you for visiting my blog. I would love to hear from you. I appreciate your time to leave feedback and help me improve this blog.
Subscribe to:
Posts (Atom)