Pages

Tuesday, May 19, 2015

Rasgulla


 Makes 25-28 Balls

Ingredients:
Rasgulla:
1 Liter milk (4 Cups)
1/2 Cup Yogurt (churned), or 2 Tablespoon Vinegar or 2 Tablespoon Lemon Juice
12-15 Ice Cubes

Sugar Syrup:
3.5 Cups sugar
7 Cups Water
1 Teaspoon Ground Cardamom
1 Tablespoon Rose Water

Method:
Rasgulla Balls: 
Boil milk in a thick pan. Once the milk comes to a boil, reduce the temperature to lowest setting and add the yogurt or vinegar or lemon juice (I used yogurt). Stir well. Keep the heat to low and cook for 5 minutes or until you see the curdled milk (chenna) floating on the top. The liquid below the floating chenna should be almost clear.

Add Churned Yogurt

Milk started to curdle

Curdled milk with clear liquid on the bottom
Add the ice cubes. This stops the chenna from getting over cooked and prevent the rasgullas from getting chewy  Stir and keep aside for 2-3 minutes. Drain with a muslin cloth. Press the cloth with both hands to squeeze out as much liquid as you can from the chenna. Put the cloth with chenna on a plate. Place some heavy weight on it and let it sit for 1-2 hours or until most of the liquid is drained out.

Drain

Squeeze out as much liquid as you can

Let it drain with heavy weight kept on top of it
 Now take the drained chenna in a plate and break it to knead smooth dough out of it. Knead with light hands no longer than 10 minutes. Over kneading will result in very smooth dough. We want the dough to have very fine/grainy texture. Make tiny balls out of it. Cover and set aside. These balls will swell upto 2-3 times their size when cooked, so make sure to make small balls.
Chenna (Paneer)

Crumbled Paneer

After 10 minutes of kneading
 
Tiny Balls
Sugar Syrup: Take water in a deep and wide pan. Add sugar and cardamom powder to it. Stir until the sugar is dissolved. Cook the sugar water on high until it comes to a boil. Now gently add all the chenna balls to the boiling sugar syrup. Keep the flame on high.  Cover and cook on high for 15 minutes, stirring gently with wooden spoon every 5 minutes. Turn off the stove and let the sugar syrup come to a room temperature.

Balls added to liquid
The balls have doubled in size
Spongy Rasgulla

Transfer into a container. Cover and refrigerate for 6-8 hours before serving.

Thank you for visiting my blog. I would love to hear from you. I appreciate your time to leave feedback and help me improve this blog.

Friday, August 1, 2014

Bhaat(Rice) na Muthiya

We used to make this muthiya at my mom's house with leftover rice. I haven't had this since I got married and moved to Settle. I had never made this before, but I had some leftover rice at home, and instantly remembered this muthiya. I made it this morning to take to work for my lunch. This is how I made it.

Ingredients: (Serves 1)
1/2 Cup Leftover Rice (We use short grain brown rice at home, so that is what I used for this muthiya)
4 Tablespoon Besan (Gram Flour),
Salt, To Taste,
1 Teaspoon Red Chili Powder,
1/4 Teaspoon Turmeric Powder
1 Teaspoon Kasuri Methi, Coarsely Crushed

Tempering:
1 Tablespoon Oil,
1/2 Teaspoon Mustard Seeds
1/2 Teaspoon Cumin Sees
1/2 Teaspoon Sesame Seeds
1 Pinch Asafoetida

Method:
Loosen, and break the rice with the help of a fork. Add the rest of the ingredients and mix well. Divide the mixture into 2 and make oblong shaped muthiya out of that.

Heat water in a steamer. Grease the steamer tray, and put the muthiya in the tray. Cover and steam on high flame for about 20 minutes, or until a toothpick inserted to the center of the muthiya comes out clean. Take off of the stove. Take out the steamer tray and let it cool completely. When the muthiyas have cooled down cut them into 1.5 to 2 inch thick pieces.

Heat oil in a pan. When hot, add the mustard seeds. When the seeds stop to splutter, add the sesame seeds and cumin seeds. Wait for 10 seconds, then add the asafoetida. Immediately add the cut muthiya. Stir to coat the muthiyas with the tempering. Cook on medium flame for 5 minutes, stirring once or twice. Take off of the stove. Serve with chutney or ketchup.

Thank you for visiting my blog. I would love to hear from you. I appreciate your time to leave feedback and help me improve this blog.

Blueberry Muffins

Its summer time here, that means time for all the fun activities. This week I took my daughter to a farm for picking Blueberries. She loves to pick the berries from the plants. A lot of berry farmers here let you pick the crop on your own. This way, they save on the labor, and in return, you get to keep the fruits you pick at a very minimal price. Sometimes at 1/4th of the price you would get them at store. We reached the farm about 40 minutes before its closing time, so we couldn't pick a lot. We picked about a pint and paid 95 cents for the organic berries. I would have paid about $2.50 at the store for the same berries.

Since we had freshly picked organic blueberries, we had to use them up soon. I made Blueberry Orange muffins with them. I saved some for making pancakes later this week. My daughter loves to help me out when I bake. She likes to mix all the ingredients in a bowl, and stir them:). She will wait eagerly near the oven and ask me every five minutes if the food we put in the oven is done.  So, she was very excited about making the muffins. Since I was making this mainly for my daughter, I didn't want to make it solely with all purpose flour, so I used half all purpose flour, and half whole wheat flour.

Here is the recipe (Makes 10 Mini Muffins)
Ingredients:
3/4 Cups Whole Wheat Flour
3/4 Cups All Purpose Flour
1 Heaping Cup Fresh/Frozen Blueberries (I used fresh)
1 Cup Orange Juice (You can use 1 cup milk with you don't want orange flavor)
2 Tablespoon Cold butter
3/4 Cup Sugar,
1 Tablespoon Brown Sugar (Optional, for Garnishing)
1/2 Teaspoon Baking Powder
1 Teaspoon Baking Soda

Method:
Heat the oven to 360 degrees F. In a bowl, combine the flours and sugar. Grate the cold butter with the help of a grater, and add to the flour mixture. Mix well. Now add the blueberries, orange juice, baking powder, and baking soda. Stir to combine everything well. The batter should be thick.

Srishti Sprinkling Sugar
Grease a muffin pan with nonstick spray, or line them with cupcake liners (I used mini cupcake liners). With the help of an ice cream scoop, scoop out 1 heaping scoop of the batter to each liner. Sprinkle the remaining sugar on top of the unbaked muffins. Transfer the muffin tin to the oven. Bake for 25-30 minutes, or until a toothpick inserted to the center of the muffin comes out clean. It took 25 minutes to be fully cooked in my oven.

Take it out of the oven. Let it cool completely before taking out of the pan.

It was very hard to keep my 3.5 years away from the tin while it was cooling down. She forced me to take out a muffin as soon as it was warm enough for her to handle and eat:).

Thank you for visiting my blog. I would love to hear from you. I appreciate your time to leave feedback and help me improve this blog.

Monday, April 14, 2014

Asparagus Chutney

 
I had a big bunch of Asparagus in the fridge last week, so thought of using up some of it to make the chutney. I served it with Moong Dal Dosa. The combo tasted very good.

Ingredients: (Makes about 1.5 Cups)
6-7 Spears of Asparagus,
1 Teaspoon oil
1 Tablespoon Chana Daal,
1 Teaspoon Urad Daal,
1/4 Cup Grated Coconut,
4 Dried Red Chilies
1/8 Cup Water
Salt to Taste

Tempering:
2 Teaspoon Oil
A Pinch Asafoetida
1 Teaspoon Mustard Seeds,
1 Teaspoon Cumin Seeds,
1 Teaspoon Urad Daal

Method:
Wash the asparagus. Discard the rough end portion (white portion) of the stems. Chop the green part in small pieces.
Heat oil in a pan. When hot, add the Chana daal and urad daal. Roast on low flame, stirring frequently for 5 minutes or until the daal starts to turn golden brown. Do not let the daals turn dark brown. Add the asparagus and dried red chilies. Sprinkle some water over the asparagus. Cook covered for 5 more minutes or until the asparagus starts to get soft. Stir often, and sprinkle more water if needed. Once the asparagus starts turning soft, add the shredded coconut. Cover and cook again for 2-3 minutes. Do not let the mixture dry out or stick to the pan. Sprinkle water as needed. Take off the heat and let it cool.
Transfer the mixture to a grinder jar and add 1/8 Cup water. Grind to a thick paste. Add more water if you desire. Transfer to a serving bowl.

For tempering, heat oil in a pan. When it is hot, add the Mustard seeds. Once the seeds start to splutter, add the urad daal. Cook until the daal just start to change its color. Then add cumin seeds. Cook for 10-15 more seconds and then add Asafoetida. Immediately switch off the stove and pour the tempering over the prepared paste. Mix well.

Serve with Paratha, Dosa, Idli or Pulao.

Thank you for visiting my blog. I would love to hear from you. I appreciate your time to leave feedback and help me improve this blog.

Thursday, February 20, 2014

Dal Makhani in Slow Cooker


A friend gifted me a slow cooker when we moved into our new house. I had been thinking of using it for a long time, but never got around it.

Finally, last night, we decided to make daal makhani for dinner for today, so I thought I will put the slow cooker to work.

Traditionally, daal makhani is made by cooking the the whole Urad daal (Mah ki Daal) on low flame overnight, so I thought it would be a perfect thing to try to make in the slow cooker.

Using a slow cooker does require some prep time though, so make sure to set aside 20-30 minutes in the morning, if you plan to turn on the cooker before you leave for work. The reward is, when you come home in the evening, you will have food, all cooked and ready for you.

Here is what I did for daal makhani in slow cooker.

Ingredients:
1 cup Whole Urad (Mah ki Daal or Kaali Daal)
3 Tablespoon Kidney Beans,
Water to soak
3 Cups water for cooking,
1 Tablespoon Oil or Butter, (I used oil)
1 Pinch Asafoetida
1/2 Cup Onion, Chopped
3 Cloves Garlic, Chopped,
1 Inch Piece of Cinnamon,
1/2 Inch Piece of Ginger, Grated
Salt to Taste,
2 Teaspoons Cumin Seeds,
3 Teaspoons Red Chili Powder,
1 Teaspoon Garam Masala,
1 Tablespoon Coriander Powder (I used Cumin-Coriander Powder, as I was out of Coriander Powder),
1/4 Cup Cream or 2% milk (I used 2% Milk for Low Fat Version)

Method:
The night before cooking, wash and soak the daal and kidney beans in enough water to completely immerse them.

Next morning, drain the water from the daal and transfer it to the slow cooker insert. Add 3 cups water, salt, chili powder, garam masala, ginger, and coriander powder.

Heat oil in a pan. When hot, add the cumin seeds and cinnamon. Once the seeds stop spluttering, add the asafoetida. Cook for 5 seconds, then add the onion and garlic. Cook on medium-low flame until the onions turn translucent. Switch off the stove, and add this to the daal mixture.

Put on the lid of the slow cooker. Cook on high for the first 2 hours, then cook on low for 5 hours. Add the milk or cream and cook on low for another hour.

Turn off the slow cooker. Mash the daal a just a little bit with a potato masher.  Serve hot with rice, naan or kulcha.


Thank you for visiting my blog. I would love to hear from you. I appreciate your time to leave feedback and help me improve this blog.

Friday, February 14, 2014

Oats Khichadi

I have been trying to incorporate oatmeal in my daily meals.
I generally don't eat breakfast. My doctor has asked me to start eating breakfast, so that I don't feel very hungry in the afternoon, and that way I can make healthy choices for lunch.

I don't like to eat sweet things for breakfast, and most of the healthy breakfast recipes I looked for where sweet, and that's when I decided to come up with a savory oatmeal recipe. I make oatmeal Khichadi at night and pack it in a container to have it as a breakfast at work. You can definitely have this as lunch or dinner.

Ingredients:

Khichadi
1/2 Cups Old Fashioned Oats (Not the Instant Kind)
1/2 Cup Daal of Your Choice (I Pick and Change Between Mung Daal, Masoor Daal, and Tur Daal)
Salt to Taste
1 Green Chili, Slit
1/4 Teaspoon Turmeric
2 Cups Water

Tempering:
2 Teaspoon Ghee or Oil  (I use Oil),
1/2 Teaspoon Mustard Seeds,
1/2 Teaspoon Cumin Seeds,
1 Pinch Asafoetida

Method:
Take out your choice of daal in a container and wash with water. Drain the water. Add the oatmeal, salt, turmeric powder, slit chili and water. Pressure cook on medium flame for 5 whistles. Switch off the stove and let the cooker cool down. Take out container from the pressure cooker.
 Heat oil/ghee in a small pan. When hot, add the mustard seeds. Once the mustard seeds stop spluttering, add the cumin seeds and Asafoetida. (Make sure to not burn the cumin seeds). Wait for 5 seconds, then add the cooked Khichadi to the pan. Stir to combine the tempering. Switch off the stove. Serve hot.

Thank you for visiting my blog. I would love to hear from you. I appreciate your time to leave feedback and help me improve this blog.

Friday, January 17, 2014

Oatmeal Upma

I don't like the traditional way of eating oatmeal at all. I just can't get past the gooey texture, plus I don't like to eat anything sweet for breakfast. But, since oatmeal is very good for our health, I tried to make savory dishes with it such as this oatmeal upma,  oatmeal chivda, and oatmeal dosa.

Ingredients:
1 Cup Oatmeal, Not the quick cooking kind
1.5 Cups Water,
Salt to Taste,
2 Green Chilies, Slit,
1/2 Teaspoon Ginger, Grated (or paste)
1/2 teaspoon Lemon Juice,
1/4 Cups Onion, Chopped
1/3 Cups Frozen Mixed Vegetables (Corn, Carrots, Peas etc).
OR
1/8 Cups Frozen Peas
1/8 Cups Frozen Corn
1 Fresh Carrot, Grated ( I Used a Grated Carrot)

Tempering:
1 Teaspoon Mustard Seeds,
1/2 Teaspoon Cumin Seeds,
1 Tablespoon Oil
1/2 Teaspoon Asafoetida

Method:
Dry roast the oatmeal in a pan until its fragrant and  it just starts to turn golden brown. Take out of the pan, keep aside to cool.

In the meantime, heat oil in  pan. When hot, add the asafoetida and mustard seeds. Once the seeds stop spluttering, add the cumin seeds. Cook for 5-6 seconds, then add the onion and chilies. Cover and cook until the onion starts to turn translucent stirring frequently. Now add the mixed vegetables. Add some salt to cook the vegetables and mix well. Cook for 30 seconds, then add the water, and the grated ginger.
Cover and cook again. Once the water starts to boil, add the roasted oats. Stir gently once. Turn the stove to simmer. Cover and cook again until all the water is soaked up by the oatmeal (about 7-10 minutes). Do not stir while the oatmeal is cooking.

Once cooked, turn off the stove. Fluff it up with a fork, and then add lemon juice. Gently stir again to incorporate the juice. Serve hot.

Thank you for visiting my blog. I would love to hear from you. I appreciate your time to leave feedback and help me improve this blog.

Wednesday, January 15, 2014

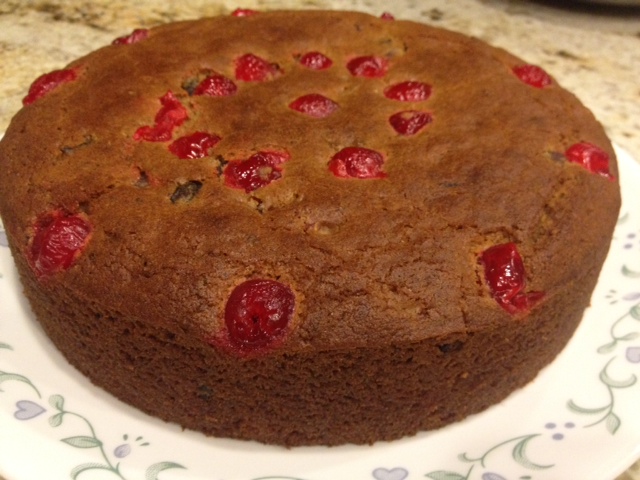
Eggless Indian Chrismas Fruit Cake (Plum Cake)

My husband loves plum cake we get in India during Christmas time. We bought a plum cake from an Indian store here. Needless to say, it didn't taste like the fresh cakes we used to get in India. So, I decided to try to make it at home. As I was going to make it at home, I omitted the eggs and the alcohol part. I know some of you might not agree that it is called a real Fruit cake without the rum, but believe me, it tasted very good. My whole house was filled with the aroma of the spices and fruits in the cake.

Some notes before starting:
For the dried fruits and nut portion of the cake, I soaked the chopped dried fruits and nuts in grape juice for 24 hour hours. You can soak these as much in advance as 1 year or 1 month, but of course I hadn't planned to make this a year ago:). Soaking in rum will give you a very authentic taste, but you can soak it in orange juice, apple juice or grape juice too.

Refrigerate: Once you add juice to your chopped fruits, mix well, and refrigerate. If left out to soak in hot climate (such as India), the juice will go sour and rancid and it might spoil your fruits and cake.

Four: I used a mix of Whole wheat flour and All purpose flour. You can definitely make this cake with 100% All purpose flour.

Dried Fruits: I used whatever dried fruits I found at the store. So my mix contained dried prunes, dates, pineapple, apricot and cranberries. I couldn't find ginger peel or orange peel, so I added dried ginger powder and lemon zest. You can use 1/2 tablespoon each of the chopped ginger peel and orange peel instead.

Nuts:  Again, I used whatever I had at home. So my cake contained chopped almonds, chopped pistachios, and chopped cashews. If you have pecan at home, that's a plus. I didn't have it at home when I was baking the cake.

Butter and Oil: I used a combination of butter and oil to make this cake. You can omit the oil altogether, and use 1 cup melted butter instead.


Now to the Ingredients:

Fruits and Nuts:
1/4 Cup Unsalted Almonds, Chopped
1/4 Cup Unsalted Pistachios, Chopped
1/2 Cup Unsalted Cashes, Chopped
1/4 Cup Dried Prunes, Chopped,
1/4 Cup Dried Pineapple, Chopped,
1/4 Cup Dates, Chopped,
1/4 Cup Dried Apricot, Chopped,
1/4 Cup Dried Cranberries, Chopped
1/4 Cup Maraschino Cherries, Chopped
1 Cup Fruit Juice of your choice (I used grape Juice)
10-12 Maraschino Cherries for decoration.

Spices:
1.5 Inch Stick Cinnamon,
2 pieces Cloves,
4 pieces All Spice, (if you can't find all spice, use total of 2 inch of cinnamon, 3 pieces of cloves and 2 peppercorns).
1/8 Teaspoon Nutmeg, Freshly Grated, (or Nutmeg Powder)
1/4 Teaspoon Ginger Powder (OR 1/2 Tablespoon ginger peel, Chopped).

Cake Mix:
1-1/4 Cup All Purpose Flour,
1 Cup Whole Wheat Flour
1/2 Teaspoon Baking Soda,
1 Teaspoon Baking Powder,
1/2 Teaspoon Lemon Zest or Orange zest (Or 1/2 Tablespoon Orange Peel, Chopped)
1-1/2 Cup Brown Sugar,
1 Cup Milk,
2 Tablespoon Apple Cider Vinegar (or Regular Vinegar),
1/3 Cup Unsalted Butter, Melted
2/3 Cup Oil

Method:
Soaking Fruits and Nuts: In a deep bowl, combine all the chopped nuts and fruits (except the cherries saved for decoration). Add the juice to the bowl. Make sure that the fruits and nuts are completely covered by the juice. (You might not need the whole 1 cup juice). Cover and refrigerate for minimum 24 hours. If you plan to soak for more than 24 hours, then stir the fruits every few days to ensure uniform soaking.
Dried fruits soaked in Grape Juice

Soaked Fruits Drained after 24 hours

Spices:
In a blender (or mortar and pastel) combine and grind the first three spices listed in the spices section. Add the ginger powder and grated nutmeg. Mix well. Set aside.

Cake:
Drain the fruits and set aside. Preheat the oven to 360 degrees F. Grease only the bottom of an 8 Inch round baking pan. If you grease the side too, your cake will have a big bulge in the center. This happens because, as the cake rises, it tries to stick to the sides of the pan. If the sides are greased, the batter can't stick well, and starts to go down again. (I learned this in a cake baking classes here). See further notes below.

Add about 1 tablespoon of the all purpose flour to the fruit mix and coat well.  Sieve the two flours and baking powder. Transfer to a mixing bowl. Add the coated fruits, sugar, lemon zest, oil and butter to the bowl and lightly mix.

In another bowl, add 1 cup of milk. Add the apple cider vinegar and mix well. Set aside only for a couple of minutes (no longer). The milk will just start to curdle. Do not panic (We want it to happen). Now add the baking soda to the milk and mix. You should see some froth in the milk. If there is no froth at all, the baking soda might have expired. It is no longer useful for baking.

Add the frothy milk mixture to the cake mix. Stir well to combine. The batter should resemble pancake batter (thick), and not runny.

Transfer the batter to the cake pan. Arrange the saved maraschino cherries on top for decoration. I let my 3 year old do that for me. She was happy to help me out and show her creativity:).

Bake for 45 minutes or until a toothpick entered in the center of the cake comes out clean. Take out of the oven, and let it cool down completely (atleast 30 minutes) before trying to take it out.

Note regarding greasing a cake pan: Personally, instead of greasing the bottom of the pan, I just cut a parchment paper to match the shape of my baking pan, put it in the bottom and pour the cake mix over it (As learned in the cake baking class). This way my cake never sticks to the bottom of the pan, it always comes out in one piece:). Also, my bake ware never has any grease stuck to it. Easy to clean, no brown spots, and it still looks brand new.

Activity for Children:
If you have kids, this is also a good family activity. I have a three years old daughter. Every time, I am in the kitchen making something, she wants to help me out (of mess up my work:)). But last night, as I was prepping for the cake, she came to me and asked me what I was doing. I said, I am making a cake. She jumped with a joy and said, I want to make a cake too. So, I thought of using some additional help from her:).

She patiently waited for me, when I said I will give her a bowl to mix all the ingredients.( I rarely see her sitting, waiting patiently). I added all the dry ingredients in a bowl, and asked her to mix them for me, while I waited for the milk to curdle. I added the milk to the flour and asked her to mix it again. And at the end, I asked her decorate the cake with the cherries. I also have a small cake pan for her. I added some of the batter in her small butterfly shaped pan. She was very happy to decorate her "own "cake. She didn't even let anyone else eat her "butterfly" cake.

 
I took our her cake in 20 minutes. As her pan was very small, and shallow. Make sure to check your cake for doneness if you choose to use different size of pan.

Thank you for visiting my blog. I would love to hear from you. I appreciate your time to leave feedback and help me improve this blog.

Monday, December 23, 2013

Sweet Potato Stuffed Paratha

I had some sweet potatoes at home and I wanted to make something savory and spicy out of them, so I decided to make parathas stuffed with the sweet potatoes.

Makes: 7-8 Parathas ( I made 7 parathas)
Ingredients:
Ghee to cook the Paratha

For the Dough
1.5 Cups Whole Wheat Flour, Plus 1/4 Cup for Dusting and Dredging
2 Teaspoon Oil,
Water as required,
Salt to Taste

For the Stuffing
1 Medium (6-7 Inches long) Sweet Potato
2 Teaspoons Amchur Powder
1 Teaspoon Garam Masala
1/4 Teaspoon Asafoetida,
Salt to Taste

To be Toasted and Ground
5 Dried Red Chilies
2 Teaspoons Coriander Seeds
2 Teaspoons Cumin Seeds
1 Teaspoon Chana Daal
1 Teaspoon Tur Daal
1 Teaspoon Mung Daal

Method:
Pressure cook the sweet potatoes for three whistles. Let it cool. In the meantime knead the dough and make the stuffing masala.

For the Dough:
In a mixing pan, add the flour, salt and oil. Knead soft dough by adding required amount of water. Apply 2-3 drops of oil to your palms. Knead the dough one last time. Cover and set aside for 10-15 minutes.

For the Masala: Dry roast the ingredients listed under the to be ground section. When cool, grind to a fine powder. Keep aside.

For the Stuffing: When the sweet potatoes cool down, peel of the skin, and mash the potatoes. Add the ground masala, garam masala, salt, asafoetida, turmeric powder and the amchur powder. Mix well. Divide into 7 equal sized balls.

For the Paratha:
Heat a griddle on medium heat.
Divide the dough into 7 equal sized balls. Take one of the balls, flatten between your palms, dredge in the flour and roll into a 3 inches diameter disc. Place one of the the stuffing balls in the center of the dough disc.
Wrap and cover the stuffing ball with the help of the dough. Gently press to flatten the dough/stuffing ball. Dredge in the flour again and roll into a 6 inches diameter disc.

Transfer the disc onto the griddle. Cook for 30 seconds or until the underside turns golden brown. Flip, and apply 1/2 teaspoon of ghee on the flipped side. Cook for another 30 seconds or until the other side turns golden brown. Flip again, and apply 1/2 teaspoon ghee on the dry side. Cook for 10 more seconds. Flip once last time. Cook for few more seconds and take off the stove. Repeat these steps for the remaining dough and stuffing balls.

Thank you for visiting my blog. I would love to hear from you. I appreciate your time to leave feedback and help me improve this blog.

Thursday, December 19, 2013

Spicy Carrot Tomato Soup (Thick Rasam)


I bought a huge bunch of carrots from Costco few days back thinking that I will use one or two everyday for juicing. Its been 5 days now, and I still haven't juiced them. So, last night, I thought of making soup from some of the carrot.

I wanted to add some spices to the soup to complement the natural natural sweetness of the carrots. That is when I thought of adding rasam masala to the soup. To add a bit tanginess, I added tomatoes and lemon juice. The end result was a mouthwatering sweet, spicy and tangy soup. The following recipe will make about 4 cups of soup.

Ingredients:

For the Rasam Powder:
1 Tablespoon Coriander Seeds,
1 Teaspoon Cumin Seeds,
1/2 Tablespoon Toor Daal (Split Pigeon Peas)
1/2 Tablespoon Chana Daal, (Split Bengal Gram)
4-5 Pepper Corns,
4 Long Dried Red Chilies (use less if you want to make it less spicy)


For the Soup:
2 Big Carrots, Thinly Sliced in Rounds (or Shredded)
1/4 Cup Onion, Chopped,
1-1/2 Tomatoes, Chopped (About 1 Cup)
Salt to Taste,
2 Teaspoon Vegetable Oil
1/4 Teaspoon Asafoetida
2.5 to 3 Cups Water

Method:

For the Rasam Powder
Dry Roast all the ingredients at very low flame for 5 minutes or until the lentils just start to change the color. Make sure not to burn the lentils. We just want them to turn light golden brown. Take off the stove. Let it cool completely. Grind to a fine powder. Keep aside.

For the Soup
Heat oil in a pan. When hot, add the asafoetida. Then immediately add the onions, carrots and salt. Cook uncovered for 2-3 minutes, stirring once. Now add the tomatoes, rasam powder and 2.5 cups of water. Cover and cook for 12-15 minutes or until the carrots are tender. Turn off the stove. With a hand blender, blend the ingredients to a thick soup. Add the remaining 1/2 cup water if you want the soup to be a bit more watery. Cook for 2-3 more minutes. Take off the stove and serve.

Notes: If you are not using the hand blender, then let the soup cool completely before transferring to the mixer/grinder. Grind to a thick puree. As mentioned above, add the remaining water if needed. Return to the stove and cook for 2-3 minutes.


Thank you for visiting my blog. I would love to hear from you. I appreciate your time to leave feedback and help me improve this blog.

Thursday, November 7, 2013

Baked Chakri


I love chakris. Traditionally, chakris are deep fried in hot oil. Once I eat one, I have to have more:).  That is the biggest reason I don't make chakris often.
This year, I made baked chakris so that I can eat as much as I want without worrying much.

In the past when I tried to make baked chakris I have found that they came out very hard and chewy. This time, I added baking powder (which I didn't in past). This made a huge difference in the outcome. My chakris were crispy, but not tough and chewy.  Here is the recipe.

Note: If you plan to make fried chakris, omit the baking powder from the recipe given below. The addition of baking powder will make your chakris very deep brown in color even before they are completely cooked.

Ingredients:
2 Cups Rice Flour,
3/4 Cup Yogurt, ( I used fat free),
3/4 Cup Warm Water (10-15 Seconds in Microwave)
Salt to Taste,
1/2 Teaspoon Chili-Ginger Paste, or to taste,
1 Tablespoon Sesame Seeds,
1 Tablespoon Cumin Seeds,
1/2 Teaspoon Baking Powder
1/8 Cup Oil
1 Tablespoon Oil for Brushing

Method:
Add everything but the water in a bowl. Now, add a little water at a time to make firm dough. You might need a little more or less than 3/4 cup of water depending on the flour you have. Once the dough has formed, apply two drops of oil to your palms and knead gently once last time.

Heat the oven to 350 degrees F. In a baking sheet aligned with parchment paper or silicone mat (I used the mat), make chakris with the help of the chakri making device/machine.

Brush each chakri with a few drops of oil and transfer to the oven. Bake for 15 minutes or until they just start tuning golden brown. Take out of the oven. Flip each chakri. Apply the oil to the flipped side and put it back in the oven for 15-20 additional minutes. The chakri is done when the color has changed to brown. Do not over bake, otherwise it will turn dark brown and you will taste brunt flavor in the chakri.

Take out of the oven and let it cool completely. Make sure that none of the chakris are soft.
Chakris can be stored in an airtight container.

For Frying the chakris, fill a deep bottom pan 3/4th way up with oil. Heat the oil until hot. You can test it by dropping a very small amount of dough in the oil. If it sizzles and comes back up right away, the oil is ready. Turn the heat down to medium. Transfer the chakris (4-5 at a time, depending on the size of your frying pan) in the pan, and cook on medium-low heat for about 2 minutes, or until it has turned golden brown, and has become crispy.
Transfer onto a paper towel to absorb the additional oil. Let it cool completely and enjoy.


Thank you for visiting my blog. I would love to hear from you. I appreciate your time to leave feedback and help me improve this blog.

Tuesday, October 29, 2013

Plum Thoku (chutney, pickle, spread...whatever you want to call it)

I had a lot of plums sitting in my fridge. I have been getting them in my weekly organic produce box from Tiny's organic. I love plums, but eating ATLEAST two a day for more then 3 weeks gets boring, so I had to find out some ways to use them up:). I have one more organic produce box due tomorrow, and I am sure I am getting more plums:)
I looked up online for spicy/savory eggless and vegetarian recipes using plum, but couldn't find anything that I liked. So, I thought of using them up by making plum thoku, just like I made the tomato thoku to use up the whole lot of tomatoes I got from my veggie garden.

While I was getting the plums out of my fridge, I saw that I also had a small bag full of tomatillos. I had planned to make tomatillo salsa out of them, but then I thought that the sourness of the tomatillos will go well with the sweet plum, and I might get a very good tasting pickle (thoku) with this combination. I wasn't wrong!!. My husband and I were licking our spoons when I emptied with pickle from the cooking pan to a jar:). Here is the recipe for the Plum-Tomatillo thoku I made.

Note: As mentioned above, I added Tomatillos as an after thought. My initial plan was to make the thoku using the plums. If you do not have tomatillos, you can add about 1.5 tablespoon of fresh lemon juice to give some tartness to the thoku/chutney/pickle.

Ingredients:
5 Medium Plums, Finley Chopped (about 1.5 cups Chopped)
5 Medium Tomatillos, Finley Chopped (about 1.5 Cups Chopped)
Salt to Taste,
2 Tablespoon Jaggery (Gud), Grated (adjust the amount based on the sweetness of the plum)
1/4 Teaspoon Turmeric Powder,
2 Tablespoon Sāmbhar Masala,

To Roast and Grind:
1/2 Teaspoon Oil,
5 Dried Red Chills
1.5 Teaspoon Fenugreek Seeds (Methi Seeds)

To Temper:
1/2 Teaspoon Oil
1 Teaspoon Mustard Seeds,
1/4 Teaspoon Asafoetida,

Method:
Heat 1/2 teaspoon oil in a pan. Once it is hot, turn the heat to medium-low and add the dried chilis and fenugreek seeds. Cook on medium-low flame for about 3-4 minutes, or until the fenugreek seeds start changing color. Do not let the seeds turn dark brown. This will give a very bitter after taste. Just roast the seeds until golden brown. Take off the stove, and transfer to a mixer grinder and set aside. Grind to a coarse powder. ( I used mortar and pastel).

Heat the remaining 1/2 teaspoon in the same pan. Once hot, add the mustard seeds. When the mustard seeds stop spluttering, add the Asafoetida and tomatillos and cover immediately. Turn the heat to medium and cook covered for 30 seconds. Take off the lid, then add the turmeric powder and salt. No need to add any water as far as the heat is set to low, and the tomatillos are getting soft and releasing water. Cover and cook stirring often.
When the tomatillos are half cooked, add the plums. Cover and cook for 1-2 minutes. Take off the heat, and roughly mash the fruits in the pan with the help of a potato masher. Add little water if the mixture is getting too dry and if the fruits are not completely cooked yet. (I didn't have to add any water).
Once the plums are almost done, add the ground methi-chili powder, Sāmbhar powder and jaggery. Stir well. Cover with a splatter screen. Cook until the mixture gets thick (like chutney/spread consistency). Turn off the stove and let the mixture cool down completely.

Serve as a side with puri, paratha, roti or spread it on toast. Tastes good on its own too.

Thank you for visiting my blog. I would love to hear from you. I appreciate your time to leave feedback and help me improve this blog.

Wednesday, October 23, 2013

Delicata Squash Soup (Panera Bread Style Autumn Squash Soup)

Yesterday my husband and I went to Panera bread for lunch. We usually order our "regular stuff" (Tomato soup or Garden Veggie soup and Mediterranean veggie sandwich) here because they have limited options for vegetarians.

Yesterday, I saw the Autumn Squash Soup on their menu under the vegetarian section. I have to confess, I am not a big squash soup fan. I have tried squash soup many times before, but it has always tasted pretty bland to me with over powering squash flavor.
Since Panera Bread is one my favorite places for soups, I wanted to see if I would like the soup here. I asked the cashier if I can taste the soup before ordering. He was happy to provide me with a small portion for tasting.

Both me and my husband loved it, and instead of going for the two different personal size soups mentioned above, we ended up getting a big bowl of the autumn squash soup. The soup wasn't bland at all, but it didn't have any spicy flavor to it either. It was sweet with mild spicy flavor. Since I loved the soup (and luckily I had received a squash in my organic basked last week), I had to try it at home.

Panera Bread's website mentions Butternut squash, pumpkin, apples, honey, and curry powder in the list of ingredients for the soup. I tried to look up for a recipe online. I saw many versions of "copycat" recipes for this soup, but none of them listed pumpkin in them. So, I made up my own recipe.

Since I had delicate squash at home, that is what I used. You can substitute with Butternut Squash if you like.

Okay, enough of the history:). Here is the recipe.

Ingredients:
1 Medium Delicata Squash, Peeled, Seeded and Chopped into 1inch Cubes (Yields about 3 Cups of Chopped Squash)
1 Cup Pumpkin, Peeled, Seeded and Chopped into 1 inch Cubes,
1 Medium Honey Crisp or Gala Apple, Seeded and Chopped into 1 inch cubes, No Need to Peel (You can try a bit sour varieties like Granny Smith too to impart some tartness to the soup),
Salt to taste
5 No. All Spice, Crushed (1 Teaspoon Powder), Optional
1 Leek, (about 1/3 Cup Chopped) Green Portion Removed, White Portion Chopped Finley (You can substitute this with Onion).
3 Tablespoon Honey,
1 Teaspoon Freshly Ground Crushed Pepper,
2 Teaspoon Garam Masala (or Curry Powder)
1 Tablespoon Oil
1/2 Cup Water
1/2 Cup Milk

Method:
Pre-heat the oven to 350 degrees F. Place the chopped squash, pumpkin and apple in a deep baking dish. Cover with aluminum foil and bake for 30 minutes, or until the squash and pumpkin get soft. Take out of the oven, take off the foil and let it cool.

In the meantime, heat oil in a pan. Once it is hot, add the leek (or onion) and cook on medium heat until translucent.

While the leek is getting cooked, mash the squash, pumpkin and apples with the help of a potato masher. Add the milk and mix well. Add the mixture to the cooked leek. Add salt, honey, garam masala(curry powder), all spice (optional) and the crushed black pepper and mix well. Add water as needed (I used 1/2 cup).

Let this mixture cook for about a minute and then turn off the stove. Let it cool a bit.

In a mixer grinder or a food processor, puree the mixture in small batches. Return the puree to the cooking pan and simmer covered for 5 minutes.

Serve hot garnished with toasted squash or pumpkin seeds.

Note: See this post for the toasted seeds recipe.
Tip: I put the seeds in the oven when I put the squash and pumpkin. The seeds were done in about 15 minutes.


Thank you for visiting my blog. I would love to hear from you. I appreciate your time to leave feedback and help me improve this blog.

Homemade Oven Toasted Pumpkin Seeds (and Delicata Squash Seeds)

I made Delicata squash and pumpkin soup two days back. When I scooped out the seeds, and was about to toss them in the compost can, I just remembered how much I love toasted seeds, so I thought of giving it a try at home.

Toasting the seeds at home is very easy, and doesn't take a long time either.

Method: Cut open your favorite squash. With the help of a spoon, scoop out all the seeds. Clean up as much  fiber/pulp you can as possible.

Pre-heat the oven to 350 degrees F.  Transfer the seeds to a baking tray (cookie sheet). For about 1/2 cup of seeds. Sprinkle some salt and mix well. Toast in the oven for 15 minutes or until crunchy.

Take out and let them cool down.

Enjoy.

Here is a picture of my new super crunchy office snack:) My homemade oven roasted pumpkin seeds.


Thank you for visiting my blog. I would love to hear from you. I appreciate your time to leave feedback and help me improve this blog.

Wednesday, October 9, 2013

Sabudana Ladoo


During navaratri, we make some sweet everyday. Yesterday, I made sabudana ladoo. My daughter loved them. The following recipe will make about 8-9 small ladoos.

Ingredients:
3/4 Cup Sabudna  (Sago/Tapioca Pearls),
1/4 Cup Powdered Sugar,
5 Tablespoon Melted Ghee,
1/4 Teaspoon Cardamom Seeds,
1/4 Teaspoon Ginger Powder,
1 Tablespoon Desiccated Coconut, (Optional)
1 Tablespoon Poppy Seeds (Optional)

Method:
In a heavy bottom pan, dry roast the sabudana on low-medium flame for 20-25 minutes, or until it just starts changing color to very light brown. At this point, add the cardamom seeds. Roast for another minute. Turn off the stove, and spread the sabudana on a plate to cool down.

Once cool enough to handle (warm), transfer to a mixer grinder and grind to a fine powder. Transfer to a mixing bowl, and add the sugar, ghee, and ginger powder. Stir and mix well. While still warm, shape into small ladoos. Spread the coconut and poppy seeds in a plate. Roll each ladoo in the coconut and then in poppy seeds (or in just one of them). Serve.


Thank you for visiting my blog. I would love to hear from you. I appreciate your time to leave feedback and help me improve this blog.

Tuesday, October 1, 2013

Creamy Tomato Basil Soup (Fresh Tomatoes)

Last week I received huge heirloom tomatoes and a big bag full of fresh basil in my weekly organic produce box from Tiny's Organic. Everyone in my house loves tomato soup. So as soon as I saw those big juicy tomatoes and the bountiful of basil, I knew what I was going to make. I make many different versions of creamy tomato basil soup.

One of the recipes I had posted earlier uses carrots, garlic and Ricotta cheese and garlic. I didn't have any carrots or Ricotta cheese at home this week, so I made another version with of the soup this time.
This time, I used onions, and fresh cream in my soup.

Ingredients:
4 Big and Juice Tomatoes, Chopped (Or about 5-1/2 cups chopped tomatoes)
1.5 Cups Fresh Basil Leaves, Chopped
1/2 Cup Onion, Chopped
1/4 Cup Cream, (Optional, Omit the cream if you want Fat-Free Soup)
2 Tablespoon Olive Oil,
1 Tablespoon Sugar,
Salt to Taste,
3 Teaspoon Freshly Ground Pepper,
2 Cups Water,
3 Tablespoon Tomato Paste
1/4 Cup Cilantro, Chopped (You can use parsley too).

Method:
Heat oil in a pan. When hot, add the onions, and turn the heat to medium low. Cook for about 5 minutes or until the onions turn translucent. Now add the tomato paste and 1/4 cup water. Cook again for 5 more minutes. Add the chopped tomatoes, salt, sugar and the remaining water. Cook covered on medium heat until the tomatoes start to soften. Add the basil, ground black pepper and cream. Cover and cook again for 5 more minutes. Turn off the heat.

If you have a hand blender, you can use it directly in the pan to blend and puree the tomatoes. Otherwise, wait until it has cooled down completely. Transfer to a mixer grinder and make puree. Transfer it back to the pan. In either cases simmer for 10 minutes or until bubbly. Switch off the stove, and serve hot.

Sorry, forgot to take a picture.

 
Thank you for visiting my blog. I would love to hear from you. I appreciate your time to leave feedback and help me improve this blog.

Monday, September 23, 2013

Tomato Pickle (South Indian Style)


This year, the summer in Seattle has been comparatively warmer and longer, which means bounty of tomatoes in my backyard.

Yesterday, I made Pesarratu (Moong daal dosas) for brunch. I didn't have shredded coconut at home, so I decided to make tomato pickle using the tomatoes from my backyard. Now, I am glad that I didn't have coconut at home:). This pickle was a big hit. I will be making more of this in big batches now.

Ingredients:
4-5 Medium Tomatoes, Finley Chopped
Salt to Taste,
2 Teaspoon Sāmbhar Powder,
3-4 Dried Red Chilies,
1 Teaspoon Fenugreek Seeds,
1/4 Teaspoon Turmeric Powder,
1 Tablespoon Jaggery(Gud), Grated
1/2 teaspoon Oil

To Temper
1/2 Teaspoon Oil,
1/2 Teaspoon Mustard Seeds,
4-5 Curry Leaves,
1/4 Teaspoon Asafoetida (Hing)

Method:
Put 1/2 Teaspoon oil in a pan. When hot, turn the flame to medium-low and add the dried red chilies and fenugreek seeds. Roast for 3-4 minutes or until the fenugreek seeds turn golden brown. Take out of the pan, and grind to powder and keep aside. (I used mortar and pastel because it wasn't enough in quantity to use a mixer grinder. It didn't take me more then 2-3 minutes to grind it.)


Heat another 1/2 teaspoon oil in a pan. Add the mustard seeds. Once they stop spluttering, add the curry leaves and Asafoetida. Fry for 10 seconds, then add the tomatoes, turmeric powder, Sāmbhar Powder and salt.
Cook on medium-low speed for 10-12 minutes or until the tomatoes are soft. Now, using a potato masher, mash the tomatoes once very gently (We don't want smooth puree). Add the fenugreek/red chilly powder. Mix well. Cook until most of the water has evaporated, and the mixture turns thicker. Switch off the stove.

Let it cool completely, then transfer to an air tight jar. This mixture can be kept in the fridge for about a week. You can enjoy this many different ways. Spread on roti or bread. Have it as a side with rice or khichadi. Use as a dip with fresh veggies or with chips etc.


Thank you for visiting my blog. I would love to hear from you. I appreciate your time to leave feedback and help me improve this blog.

Wednesday, September 4, 2013

Soft and Fluffy Ricotta Cheese Pancakes (Eggless)

Ingredients:
1/3 Cup All Purpose Flour (Maida),
1/4 Cup Ricotta Cheese
1/4 Cup + 2 Tablespoon Milk,
1/2 Teaspoon Baking Powder
1/4 Teaspoon Salt
1 Tablespoon Sugar
3 Teaspoon Butter

Method:
Add the cheese, flour, baking powder, salt, and sugar in a bowl. Mix well. Now add 1/4 Cup milk and mix. The batter should be thick but pourable. If the batter is too thick, add 1-2 Tablespoon milk as required. Mix again.

Heat a cast iron or non stick skillet. Drop a teaspoon of butter in the center. Now pour a ladle full of the batter in the center. The batter will automatically spread out. Cook on medium low heat or for a minute or until the underside is golden brown. Flip, and cook again.

Serve hot with butter and your choice of pancake syrup. I personally like agave syrup better.


Thank you for visiting my blog. I would love to hear from you. I appreciate your time to leave feedback and help me improve this blog.

Friday, August 23, 2013

Quinoa Stuffed Pattty Pan Squash

This week I received leeks and  a medium size patty pan squash in my weekly organic produce box from Tiny's organic along with the rest of the fruits and yummy veggies.. We don't cook with squash very often at home, so I didn't know what to do with it. Then I just remembered that last summer, when I received the squash, I had made quinoa stuffed squash and everyone enjoyed it.
So again, this year, I made the quinoa stuffed squash. It tasted very good. Even my 2.5 years old daughter loved it.
The squash has a mild sweet flavor, which blends very well with the herbs and spices added in quinoa.

A note before I get into the recipe: A lot of the recipes online call for boiling the squash in hot water for 20 minutes. I forgot to boil the squash. I stuffed it with the quinoa mixture and directly cooked it in the oven. It came out perfect. May be because my squash was very tender, or may be I was lucky:).

My TIP: If your squash is tender, i.e. you can cut the top of the squash very easily without applying a lot of pressure, then I think you can avoid the boiling step. Otherwise, pierce the squash at 1-2 places, and immerge in salted boiling water. Boil for 10-15 minutes until just tender. It should still hold its step pretty well. We are going to back it in the oven.

Here is the recipe.
Ingredients:
1 Medium Patty Pan Squash (7-8 inch diameter)
2 Teaspoon Oil,
1/2 Cup Quinoa,
1/2 Cup Water
1/2 Cup Leek, Chopped, (Tough Greens Removed), You can use onions instead of Leek,
1/8 Cup Corn,
1/2 Bell Pepper, Chopped,
1/8 Cup Peas,
1/8 Cup Carrots, Sliced,
Salt to Taste,
2 Teaspoon Mexican Oregano, Crushed by Pinching Between the Thumb and the Index Finger,
2 Teaspoon Cumin Powder,
2 Teaspoon Crushed Red Pepper, or to Taste,
3 Tablespoon Mexican Blend Cheese, + 1 Teaspoon for Garnishing, Shredded
3 Tablespoon Coarsely Ground Almonds

Method:

Preparing the Squash
With a sharp knife, cut out the top portion of the squash. Discard the top or keep it aside for decoration. Keep the bottom/flat portion intact.

With the help of a spoon, scoop out the seeds and the flesh of the squash. Discard the seeds, and chop the scooped out squash in small pieces.


To Cook the Quinoa:
Wash quinoa under running water. In a boiling pan, add the quinoa and half a cup of water. Add salt to taste. Set it on the stove. Once the water starts boiling, immediately turn the heat to low, and cook covered for 20 minutes, or until all the water is soaked up by quinoa. Cover and Keep aside.

While the Quinoa is cooking, heat 2 teaspoon of oil in another pan. Once it is hot, add all the veggies, chopped squash and salt. Stir and cook on medium flame for 2 minutes. Now add the cumin powder, crushed red pepper, and crushed oregano. Cook covered on medium-low flame for another 3-4 minutes or until the veggies are just tender. Again, we don't want to cook them until they are mushy. They will get cooked in the oven too.

Cook the Veggies:
Pre-heat the oven at 350 degrees F. Take the veggie mixture off the stove. Add the hot quinoa too it. (If the quinoa has cooled down, then cook it in microwave for 30 seconds). While the mixture is still hot, add the cheese and almonds to it. Mix well until all the cheese is combined.

Baking:
Place the cored-out squash in a deep baking dish. Stuff it with the cheesy quinoa mixture. Top it with 1 teaspoon shredded cheese.Cover loosely with an aluminum foil, and bake for 30 minutes if you didn't pre-boil it or 20 minutes if you boiled it earlier. Pierce with a knife to check doneness. You should be able to pierce the knife without applying much force.

Take out of the oven and serve hot.


Thank you for visiting my blog. I would love to hear from you. I appreciate your time to leave feedback and help me improve this blog.