Pages

Saturday, February 28, 2009

Vegetable Potli in White Gravy (Veg. Patiala)


A few years ago, at a restaurant in India, I had tasted a subzi called vegetable patiala. I vaguley remember that the curry was red and it had potli (dough pouches) filled with veggies or may be potato mixture. It looked very good, and tasted good too. Since then I have been looking for a recipe for vegetable patiala, but never found one.
So, today I decided to make my own version of vegetable patiala:) I made green potlies out of wheat floor and purred coriander, and cooked them in white gravy. Here is the recipe for vegetable patiala i.e. Paneer Potli in White Gravy.

For the Potlies:
3/4 Cup Wheat Flour
1/2 Cup Coriander or Spinach (for Green Color)
Salt to Taste
1 Teaspoon Oil

For Stuffing:
1/4 Cup Crumbled Paneer (home made works the best)
1/4 Cup Mixed Veggies (Carrots, Corn Kernels, Peas, Green Beans etc.)
Salt to taste
1/4 Teaspoon Ginger Garlic Paste
1/8th Teaspoon Sugar

For White Gravy:
1 Teaspoon Ghee (or Unsalted Butter)
1 Medium Onion
1 Clove Garlic, Finely Chopped
1 Teaspoon Ginger Grated (or Ginger Paste)
1/2 Cup Cashewnuts
1/4 Teaspoon White Pepper Powder (You can also use 2 Slit Green Chillies Instead)
1 Stick Cinnamon
2-3 Cloves
2-3 Cardmom Pods or, 1/8 Teaspoon Cardamom Powder
A Pinch of Nutmeg Powder (Optional)
1/4 Cup Mixed Veggies (Optional)
3/4 Cup Yogurt (You can use Ricotta if you like)
Chopped Coriander (or Parsley) for Garnishing

Method :

Stuffing:
Coarsley grind mix vegetables in a grinder and mix with all the stuffing ingredients. Keep aside. Note: If you are using fresh vegetables, then boil the vegetables until almost cooked and coarsley grind them.

Polti:
Boil coriander in 1/2 cup water. When cooked, add to a grinder and make puree. Now add this puree, salt and oil to the floor and knead into firm dough. The dough should look green in color, so if neccessary add more coriander puree.

To make potlis, roll the dough into a 3 to 3/12 inch round (as thin as you can). Then place 1 spoon full of the stuffing mixture in the center of the round. Start folding the sides in the shape of a potli (or any other shape you like). The potli should be tight enough, and shouldn't open up while cooking in the gravy (apply cold water on the sides while folding if needed). Make as many potlis as you can with the flour and keep aside the remaining stuffing mixture.

Now steam the potlis for about 10 minutes in a dhokla vessel or a bamboo steamer or in a pressure cooker, with the whistle removed. Once the potlis are cooked, take them out of the vessel and keep aside.

For the Gravy:
Cut the onion in big pieces and boil it in 1-1/2 cup water. When cooked, drain blend in a mixer along with cashewnuts. (Add a little water in needed, you can add the same water in which the onlion was boiled).
Heat ghee in a pan and add cinnamon sticks, cloves, garlic, and cardamaom pods. (If using cardmom powder, don't add it now). When the ghee starts bubbeling, add the onion cashewnut paste, Ginger, Garlic and let it cook at medium heat for about 5-7 minutes. Add water if necessary and keep stirring occasionaly. Now add the remaining stuffing mixture, yougrt, white pepper powder (or green chilies), cardamom powder(If using) and veggies. Let it cook for 5 minutes and add the potlis. Make sure to not break the potlis while stirring the gravy. Let it simmer for 3-4 mintues and serve with naan or paratha.

Helpful Links:

My Little Pea Plants

I wanted to grow Indian peas here in WA, but I couldn't find seeds for Indian Peas (English Peas) in any store here. So I decided to grow them from the dried peas I had at home. You can get dried green peas at any Indian grocery store.

Just like my methi plants, I sprouted the peas for about a week and when the sprouts grew about an inch tall, I put them in a container full of potting soil. I layered(about 1/2 inch) more soil on the seeds,to partly cover them and sprayed some water, to keep the soil moist.

To my surprise, just after 4-5 days, the sprouts started getting leaves. Here is a picture of the tinly leaves on my tiny pea plants:)
Yesterday, I transplated my pea plants out on the ground. Pea plants like cold weather, so it is actually advisible to plant them directly outdoor. I had to get rid of moss in my backyard, so I started the plants indoor.

I will update this post with new pictures if the plants survived outside:) I have heard that some plants do well even after transplanting and some plants don't. Hopefully pea plants are sturdy enough and can survive after transplanting.

Method (notes) for sprouting the seeds:
1. Soak the seeds overnight.
2. Drain all the water and spread the seeds on a cotton cloth.
3. Loosley wrap the cloth around the seeds and keep it in a warm place (if possible).
4. The cloth should be damp all the time. If the cloth starts drying you can either rinse the seeds with more water and wrap them again in the cloth, or spray some water on the cloth.
5. You will start seeing sprouts in a day or two. Once the sprouts are about an inch long (6-7 days depending on the sprouts' growth), you can directly plant the seeds outdoors.

Monday, February 23, 2009

Misal Pav or Usal

Usal is a nutritious Maharashtrian Dish. It is a spicy curry made with sprouted pulses and served topped with yogurt and spicy chivda. This spicy curry served with bread is called Misal Pav. Traditionally usal is made with sprouted math beans, but I make it with a varietly of pulses.

For sprouting, you will need
1/2 cup Mung Beans
1/2 cup Math
1/4 cup Dried Green Peas
1/4 cup Dried White Peas
1/4 cup Dried Kala Chana

Soak all the above pulses in 3 cups of water overnight. Drain and spread the pulses on a wet cotton cloth. Loosley wrap the cloth around them and store it for 12-24 hours, depending on the size of the sprouts you want. If the cloth seems to dry out, spray some water. Alternatively you can remove the seeds, rinse them and loosely wrap them back in a wet cloth.

Now for the masala
3 Teaspoon Red Chilli Powder
3 Teaspoon Whole Coriander Seeds (Dhaniya)
2 Teaspoon Cummin Seeds (Jeera)
2 Teaspoon Sesame Seeds
2 Teaspoon Fennel
1 Stick Cinnamon
2-3 Cloves (Lavang)
4-5 Peppercorns

Grind all the above ingredients in a fine powder. Once you have the masala ready, Usal can be made in no time.

For the curry you will need
One Medium Onion sliced
1/4 Cup Shredded Dried Coconut (You can use fresh coconut too)
1/4 Cups Peanuts
1 Medium Potato Diced in Small Pieces
1/4 Teaspoon Tamarind
1/4 Teaspoon Mustard Seeds
1/4 Teaspoon Jeera Seeds
1/4 Teaspoon Turmeric Powder
3 Teaspoon Oil

Method:
Heat oil in a pan and add mustard seeds. When the seeds start crackling, add cummin seeds and peanuts. Stir and cook a for a few minutes and add the sliced onion. When the onions start turning pink, add the shredded coconut, garam masala powder, salt, and turmeric powder. Stir and cook for 2 mintues and then add the sprouts. Let it cook for 5 minutes until all the sprouts are coated with the onion and masala mixture. Now add 4 cups of water and bring it to a boil. (You can change the quantity of water accoring to your curry consistency preference.) Let it cook until the potatoes and the pulses are done. The curry should be hot and spicy. It is served with yogurt, which will make it a little milder.

To Serve:
Spicy and Crunchy Chivda (Any kind works, you can get this at any Indian grocery store)
Chopped Onion for Garnishing
Chopped Coriander (Cilantro) for Garnishing
Yogurt
Red Chili Powder
A slice of Lemon

Pour the curry in individual bowls. Top it up with a dollop of fresh yogurt and crunchy and spicy chivda mixture. Sprinkle with red chili powder, garnish with chopped raw onion and chopped coriander and serve with a slice of lemon on side.


Helpful Links:

Wednesday, February 18, 2009

Ringana No Olo

Traditionally Olo (Bharthu) is made by roasting eggplant on open fire. The skin is then removed and the flesh is mashed to make bharthu (Olo).

I make Olo by roasting eggplant in oven.

Ingredients:
1 Eggplant
1 Bunch (about 4) Spring Onions
1/4th Cup Frozen Green Peas (Optional)
Salt to Taste
1 Teaspoon Garam Masala ( I use Rajwadi Garam Masala)
1 Colve Garlic, Finely Chopped
2 Teaspoon Red Chilli Powder
1-1/2 Teaspoon Dhaniya Jeera Power (Coriander Cummin Powder)
Water
1-1/2 Teaspoon oil
A Pinch Asafoteda
Coriander leaves (Cilantro) to Garnish

Method:
Pre heat oven at 375 degrees. Wash the eggplant and pat it dry. Make 2 small vertical slits on opposite sides of the eggplant and place it on an oven safe tray. Let it cook at 375 degrees for about 20 minutes and then flip sides. Let it cook for 30 more minutes. Check by inserting a knife in the eggplant. If the center feels firm, then let it cook untill done. Once done, take it out of the oven and let it cool.
In the mean time, chop the spring onions with its leaves. Heat oil in a kadai. Once hot, lower the flame and add asafoteda and cover with a lid for a few seconds. Now add the spring onion greens and whites, garlic and some salt and let it cook at medium heat. Keep stirring occasionally.
While the onion is cooking, peel the skin off of the eggplant and mash it.
Once the onion is cooked, add red chilli powder, dhaniya jeera powder, garam masala and frozen peas. Stir and cook it for five minutes. Now add the mashed eggplant add some water if needed, and cook untill the peas are done. (about 10 more minutes).
Garnish with chopped cilatnro leaves and serve with rotla and urad daal.


Adad Ni Daal

Adad ni daal goes well with Bajra na Rotla and Ringna no Olo. This daal is prepared unchurned and is thick in consistency. Some people don't like this daal because it becomes a little sticky when cooked.

Ingredients:
1/2 Cup Split Urad Daal (White ones, without skin)
2 Cups Water
2 Green Chillies
Salt to taste
1/4th teaspoon Dhania Jeera Powder
1/4th teaspoon Turmeric Powder
1/4th teaspoon Freshly Grated Ginger
Chopped Coriander(Cilantro) for Garnish

For Temperaing:
1/2 Teaspoon Ghee
1/4th teaspoon Jeera (Cumin)
a pinch asafoteda (Hing)
1/2 teaspoon Red chili powder

Method:
Wash the daal thoroughly and pressure cook it with 1 cup of water for three whistles. Once cooked, add one cup water, salt, turmeric powder, green chilies slit (deseed for mild flavour), ginger, and dhania jeera powder. Add more water for desired consistency. Boil on medium heat for about 15 to 20 minutes. Turn off the flame.

For tempering: Heat ghee in a small pan. When it starts smoking, lower the flame and add jeera. Once the Jeera starts craking, turn off the flame and quickly add hing (asafoteda) and red chilli powder.

Add the tempering to the cooked daal. Garnish with coriander (cilatnro) and Serve hot.

Note: If the flame is not lowered or turned off while adding red chilli powder, the powder will burn and turn brown.


Helpful Links:

Bajra Na Rotla

My family is originally from Saurashtra (south Gujarat) where dry spices are used to cook food. Though I have never been there, I like some dishes from this region. One of them is Bajara na rotla served with Ringna no olo (Gujarati Baigan Bharta)and Adad ni daal. (Cooked Urad Daal).

People say that this used to be poor famer's food. Bajra flour is nutritious, and rotla can be made in no time. Raw white onion is eaten with Rotla, Olo and daal.

Making rotla is a little difficult. Bajra flour soaks a lot of water, and doesn't hold up very well while transfering to the pan.

Here is the recipe for Bajra na Rotla:
1 cup Bajra flour (Millet Flour)
Salt to taste (Optional)
warm water
Ghee

Method:
Mix salt and Bajra flour. Now add a little water at a time and kneed into firm dough. Add water as needed and make sure it is warm if not hot. The dough should be soft enough to be pressed into a roti with your hand but firm enough to hold its shape.

Traditionally rotlas are cooked on a clay pan, but a regular non stick sauce pan works well too.

Heat a clay pan or a sauce pan.

Now wet your palm and place a medium size ball of dough in between your palms. Gently press and flatten the ball. Keep flattening it (until the desired thickness is achieved)as if you are clapping your hands gently. You will have to keep your palms wet so that the dough doesn't stick to your palms. Rotlas are made aslmost as thick as the naans you get any Indian restaurant, but you can obviously make it thinner if you like.

My rotlas never turn out round when I try this patting method, so I have given up on getting the exact round shape:)

When the flour is flattened, gently transfer it to the sauce pan. After 30 seconds or so, apply water over the top surface of the rotla. This prevents cracking on the top surface, and keeps it in one piece.

Cook on low flame for about a minute and then gently flip it over to cook the other side. Turn the heat to medium high while cooking the other side (for another minute or so). Gently press the top surface of the rotla with a clean kitchen cloth. This will help make the rotlas softer. Now turn again and cook the other side until fully cooked.

Remove from heat, and poke some holes with a spoon. Apply ghee on the top surface and pour some in the holes.

Serve with Ringna no olo, udad daal, and ghee jaggery mixuture.

Note: If the patting method for flattening the rotla sounds a little difficult or if the rolta starts breaking then try the following method.

On the rolling pan, place a plastic sheet. Spread some Bajri flour on the sheet and then place the dough ball and press lightly to slightly flatten it. Spread some Bajra flour on the flattend ball and place another plastic sheet on the flattened ball. Lightly roll the rolling pan over the sheet until the desired thickness is achieved.


Helpful Links:

Sunday, February 15, 2009

Chutneys for Vada Pav

Green Chutney:
Ingredients:
Coriander(Cilantro) a small bunch
4-5 chilli pepper (reduce the quantity of peppers if you like it mild)
1/2 tablespoon peanut
Salt to taste
Lemon juice (from a medium size lemon)
about 1/4 cup water
salt to taste

Method: Add peanuts in a griner and grind to fine powder. Now add all the other ingredients and water and grind to a fine paste. (Add a little water at a time, while grinding)


Sweet and Sour Chutney:
6-7 dates
1/2 cup water
1 tablespoon jaggery (you can add more jaggery according to your taste)
1 teaspoon Tamarind (I use amchoor(mango) powder instead)
Salt to taste
1 teaspoon jeera powder.
1/4 teaspoon red chilli powder

Method: Boil dates and tamarind in half a cup of water and let it cool. Don't discard the water. Add all the above ingredients along with the dates, tamarind and water to a grinder and grind to a fine paste. Add more water if the chutney is too thick.

Garlic Chutney:
3-4 cloves garlic
2 teaspoon red chilli power.
Salt to taste
3 tablespoon water
2 teasoon dalia powder.(optional)

Method: Combine all the above ingredients in a grinder and grind to a fine paste.

Saturday, February 14, 2009

Vada Pav

One thing I miss the most about Mumbai is Vada Pav. It is like a part of daily life for many Mumbaikars. It is cheap, filling, tasty, and you get ANYWHERE you go in the city. I used to eat it a lot during my college days.

I remind my husband almost everyother day that I miss vada pav, and when I go back to India, the first thing I will eat will be Vada Pav:)

My husband gave me a valentine's day surprise by making vada pav for me and I must add that it tasted really good.
Here is the recipe for making vada.

Makes about 15 vadas

Combine the following ingredients and mix well.
6-7 medium size potatos, boiled and mashed
3-4 finely chopped green chillies.
1-1/2 teaspoon ginger, grated
salt-to taste
1 -1/2 teaspoon garam masala ( I use Rajwadi garam masala)
1 clove garlic, grated
1/2 teaspoon turmeric.
1/4 th cup corriander leaves chopped

For tempering:
1 teaspoon mustard seeds
1/2 teaspoon cummin
1 teaspoon urad dal
3-4 curry leaves
2 teaspoon oil
a pinch asafotida
Heat oil in a pan and add mustard seeds. When the seeds start crackeling, lower the flame, add urad daal and curry leaves. Then add Cummin seeds (jeera). Switch of the gas and and asafoteda.
Add the tempering to the potato mixture and mix well.


Make medium size balls of the potato mixture and leave aside.


Now for the batter:

About 3/4 cup besan flour
1/4th teasoon turmeric
salt to taste
about 1/4th (or a little less) teaspoon red chili powder
water
Before you start making the batter, heat enough oil in Kadai to deep fry the vadas.
Mix all the above batter ingredients except water. Add a little water and mix well. Add water if needed, and make thick batter. (The batter should not be too liquidy).
Dip each ball in the batter and deep fry until golden brown. Remove from the kadai and place it on a paper towel lined plate, so that the paper soaks all the additional oil.


To serve you will need:
Fresh garlic Chutney and
Dried garlic Chutney ( I use ready made bought from the store)
Bread(Dinner Rolls or French Sandwich Rolls)

To assemble:

Make a horizontal from a side of the bread. Spread all chutneys on the bread per taste. (If using Sandwich rolls, cut the bread in half). Then put a vada on the bread and close to top half of the bread.


Vada pav is ready to be served!!. Enjoy.


Wednesday, February 11, 2009

My Methi (Fenugreek) Plants are Growing!!!

Since we moved into our new house this year, I was waiting for this time of the year. Why? This is the time when you can start sowing seeds for your summer plants and start growing them indoor. By the time it starts getting warm outside(in two months or so), the plants are big enough to transplant in your backyard, so that you can get fresh harvest through out the summer.

This is my first time gardening, so I am excited to try out planting different things and learn what can or can not grow in the Northwest region.:)

So, the first plant I started indoor is Methi (Fenugreek). You can buy methi seeds at any Indian grocery stores. These are the same seeds you use for cooking.

I used some seeds I had at home. I soaked some seeds overnight in water. The next day, I drained all the water out and put the seeds in a damp paper towel. I wrapped the paper towel around the seeds and put them in a warm location (on my fridge). For the next two days, I kept the seeds from drying out by spraying some water on the paper towel twice a day.

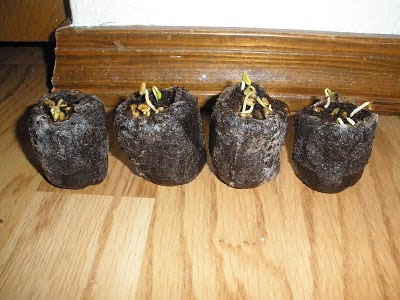
After 3 days, the seeds had sprouted!! I put the seeds in a peat pot to start my little methi plants (Put 4-5 seeds per pot). I think these peat pots are nothing but potting soil packed in a thin net. Once the plants grow, you can dig a hole in your backyard and directly put peat pots in the hole. There is no need of removing the plants from the pots.

Here is a picture of the sprouts growing in the peat pots, 2-3 days after planting.

Make sure you keep your plants moist but not wet. Also monitor the plant's growth for the first few days after putting them in the peat pots. Some sprouts will be very small in size compared to some which might be growing quick.

At this point, you need to thin your plants. Thinning means getting rid of the slower growing plants from each pot, so that the quicker growing plants can get more nutrients. I removed one or two slower growing plants from each pot, leaving 2-3 plants per pot.

I think that methi grows very fast. After 12 days of planting, my plants are about 4 inches tall. Here is a picture of my current plants.

As you go near the pot, you can smell fresh methi. It smells very good.

This was my first time, so I started with very few seeds. Next time, I will sprout more seeds to get more methi plants.

I can't wait to see my methi plants in full bloom. I will update this blog again after a week or so with some new pictures of my methi plants.

Here is a list of the plants I am planning to grow this summer. I don't know if I will be successful in growing them all, but I will still try:)

Okra
Spinach (already started with methi...will post the pictures soon)
Chilli Pepper

I have saved some seeds of 'Karela' (Bitter gourd), so I will try to grow them too.

I have bought the following seeds which I will saw directly in my backyard as soon as it starts to warm up here.
Egg plant
Cucumber
Peas
Green Beans

So, what are you planning to plant this summer?

Helpful Links

:

Sunday, February 8, 2009

Low Fat Gajar Ka Halva

My husband loves this halva, so I make it often. I use Ricotta cheese to make this. Adding ricotta gives nice texture to the halva.

Ingredients:
Shredded Carrots, about 8 to 10 (Medium size)
1-1/2 cup low fat or fat free milk.
1 cup low fat or fat free Ricotta cheese.
1 to 1-1/2 tablespoon Ghee
a pinch of salt
8 to 10 teaspoons sugar or 4 small packets of splenda. (you can add more sugar per your tast4-5 strands of Saffron (Kesar),
2 pinches of cardamom powder
4-5 almonds, chopped in small pieces
4-5 cashews for garnishing.


Preparation:

Heat ghee in a pan. Once the ghee is hot enough, reduce the flame and add the shredded carrots and a pinch of salt. Adding a pinch of salt will bring carrot's natural sweetness out. Increase the flame to medium and stir and cook until most of the liquid is evaporated. Now at this time add the Ricotta cheese and cardamom powder. Mix and stir for next 5-7 minutes (the mixture should start drying at this time). Add sugar and mix well then add milk and saffron. Bring the flame to high and cook until the consistency of the mixture is thicker. Let it cool and garnish with cashews and chopped almonds.

Note: When you add milk and set the flame on high, the milk will start bubbling. It is advisable to use a splatter guard to prevent the mixture from splattering outside.

Helpful Links:

Friday, February 6, 2009

Peanut Sauce

Ingredients

1 cup roasted peanut ground to a fine powder.
1 1/2 cups water
2 Teaspoon Soy sauce
salt to taste
2 teaspoon sugar
1 teaspoon
1 clove garlic, chopped into fine pieces
lemon juice
1 teaspoon Oil

Method:

Heat oil in a pan and add the chopped garlic.

Let it cook for 3-5 minutes till the garlic turns pink but not brown.

Now add soy sauce, salt and sugar. Stir and let it cook for a minute.

Add water and bring to a boil.

Add the peanut powder and keep stirring. (You can add some more water if you prefer to, I like my sauce a little thick.)

Remove from the heat after two minutes.

Add some lemon juice according to taste.


This sauce is delicious with Spring rolls or even with salads.

Vietnamese Spring Rolls (Summer Rolls)

Every time we go to a Thai restaurant and order fresh spring rolls as an appetizer, I tell myself that I should try to make them at home sometime. Last week finally I gave it a try. Since had never made them before, I was a little skeptical. To my surprise they turned our pretty good and I will be making them often.


Here are the ingredients needed to make spring rolls at home.

Rice paper wraps
Rice Noodles
Lettuce leaves shredded or cut in small size ( I used Romaine Lettuce)
Grated Carrots
Mung Sprouts
Yellow Bell Pepper (Thinly Sliced)
Chopped spring onion greens
Mint leaves, Coarsely chopped ( I used Whole)
Basil leaves, Coarsely Chopped ( I used Whole)
Fresh Coriander(Cilantro) or Parsley Leaves (Coarsely Chopped)
Salt and Ground Black Pepper to taste
Peanut Sauce Thinned by Adding Some Water

Preparation:

To be added to the noodles:
2 Teaspoon white vinegar
salt to taste
1 Teaspoon sugar

Mix the above ingredients and stir until the sugar is dissolved.

Noodles:
Boil some rice noodles according to the package instructions (about 8-20 minutes).
Drain and shock with cold water to avoid over cooking. Soak the noddles in the sugar vinegar mixture.

Rolls:
Have all the ingredients ready before you soak the rice papers in water.
Soak a rice paper in warm water for 30 seconds.
Remove the paper out and soak another paper while you are preparing the first roll.
3/4th way down on the paper wrap put a lettuce leaf. Spread some shredded carrot on the lettuce leaf. Now add some noodles, then add the yellow pepper, sprouts, salt and pepper to taste. Now add some drops of thinned peanut sauce (or make a very thin line), then add two fresh leaves of mint, two leaves of fresh basil, and then at the end add some fresh coriander leaves.

Start rolling up the bottom end of the roll. Almost halfway through, fold the sides inwards and then continue folding up.

Cut the roll in half and serve with some home made peanut sauce.

Enjoy.


Helpful Links: